

3.2.21. Linksys SPA921
Features

Standard features on the SPA921 include a high resolution graphical display, speakerphone, and a 2.5 mm head-set port. The SPA921 supports one line with two call appearances and provides support for three way conferencing, attended call transfer, and placing a call on hold to answer another one.
Features
Standard features on the SPA921 include a high resolution graphical display, speakerphone, and a 2.5 mm head-set port. The SPA921 supports one line with two call appearances and provides support for three way conferencing, attended call transfer, and placing a call on hold to answer an incoming call. The line can be configured as a unique phone number (or extension), or can be configured to share a number that is assigned to multiple phones.
Comprehensive Interoperability and SIP Based Feature Set
Based on the SIP standard, the SPA921 has been tested to ensure comprehensive interoperability with equipment from VoIP infrastructure leaders enabling service providers to quickly roll-out competitive, feature rich services to their customers. With hundreds of features and configurable service parameters, the SPA921 addresses the requirements of traditional business users while leveraging the advantages of IP telephony. Features such as easy station moves, presence, and shared line appearances (across local and geographically dispersed locations) are just some of the many advantages of the SPA921.
Carrier-Grade Security, Provisioning, and Management
The SPA921 uses standard encryption protocols to provide secure remote provisioning and unobtrusive in-service software upgrades. Linksys secure remote provisioning tools include detailed performance measurement and troubleshooting features, enabling network providers to deliver high quality support to their subscribers. Remote provisioning also saves service providers the hassle and expense of managing, pre-loading, and re-configuring customer premise equipment (CPE).
Installation
Notes:
Here is a quick step by step installation of Linksys SPA921:
Asterisk Configuration
Before going further reading this tutorial make sure you have asterisk server and you are familiar with adding users to asterisk. If you are not aware of this issue you can read the tutorial explaining how to add new users to asterisk.
Linksys SPA921 is working with the SIP (Session Initiation Protocol). You will have to create a SIP user. Open /etc/asterisk/sip.conf and add the user at the bottom at the file.
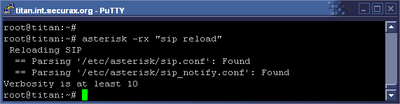
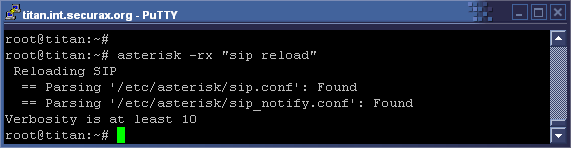
Then reload Asterisk's sip configuration by executing the command `asterisk -rx "sip reload"`.
At one point we will want to receive calls on our phone, that's why we have to create an extension for this. We will achieve this by adding extension `1001` in our default context in extensions.conf configuration file, located at /etc/asterisk
If you meet some troubles with Asterisk configuration, you might want to check the configuration files used in this test:
Initialization
When you power up the phone it will start up. It will boot its operational system. When its ready you will be able to press the options button (the one which looks like page). In order to operate with the phone you will have to configure some options.
Network - network options are the the ninth option. Use the navigation buttons and press Select.
SIP Options - in order to configure the account on the phone you will have to use the web-interface. In order to have access to it you will need to configure you network settings and enable the web interface from the phone menus (it is enabled by default). Type the IP address in your browser and enter into administration mode by clicking `Admin Mode`. You will be prompted for password if you have set such. Then go to Ext 1 tab as is shown below.

This is the location where you can configure your account.
Now you are ready to use your Linksys SPA921. In the next pages you will find some advances options and configurations of the hard phone.
Using the Web interface
Most of the options are accessible through the web configuration interface. In order to access the web interface you will need a correctly configured network. An example is shown on the previous page.
The web interface is divided into seven tabs. Every tab gives different information. Here are the seven tabs:

The first tab named `Info` will show you different information for your hardphone.
The second tab named `System` will allow you to reconfigure hardphone's network configuration.
The third tab named `SIP` will allow you the configure some advanced SIP options
The fourth tab named `Regional` will allow you to configure some Regional settings as well as the service activation and deactivation codes
From the fifth tab named `Phone` you will be able to set some settings concerning the user such as sounds, naming, logos, etc...
From the sixth tab named `Ext 1` you will be able to set the SIP settings for Ext 1 (actually the only one)
From the last tab named `User` you will be able to set additional user options such as Call Forwarding, Speed Dialing and Audio settings.
Using Phone Menus
1. Directory - To view your phones directory options, press the Setup button, then 1, then the soft button under select.
2. Speed Dial - Enter up to 8 speed dial numbers. Each one can be a phone number, IP address or URL. To setup or edit Speed Dial, press the Setup button, then 2.
3. Call History - You can view lists of recently received (up to 60) incoming calls in Call History. Choose from Redial List, Answered Calls or Missed Calls. To view the phones Call History lists, press the Setup button, then 3. To review a list, use the navigation button to highlight it and press select. To redial a number from the list, press dial. You can also choose to delete, edit or cancel entries from these lists.
4. Ring Tone - Each extension of your phone can have a different ring tone. You can download up to 10 ring tones at Linksys.com To change a ring tone, press the Setup button, then 4. Use the navigation button to highlight the extension you want to change the ring tone for and press change. You will see several choices. Press play to hear the tone, press select to choose it.
5. Preferences - You can set six different preferences for your phone. To select a preference, press the Setup button, then 5.Use the navigation button to highlight the preference to change, then press the soft button under edit.
6. Call Forward - You can forward all calls, calls when the phone is busy or calls when there is no answer: To change a ring tone, press the Setup button, then 6. Use the navigation button to highlight the call forwarding feature that you want to use.
8. Voice Mail - Voice mail service must be available on your network, to use this feature. To access your voice mail box, press the Setup button, then 8. Enter the extension number for the phones voice mail box, then select save. Your Phone Administrator can provide this number to you.
9. Network - network options were already described in the previous page.
10. Product Info - This setting displays the product name, serial number, software version, hardware version, MAC address and Client Certificate.
11. Status - This setting displays the status of the phone, extension and line buttons.
12. Reboot - This setting is to configure and troubleshoot the network. You should not change this settings unless directed to by your Administrator as this can negatively affect your phones function.
13. Restart - This setting is to configure and troubleshoot the network. You should not change this settings unless directed to by your Administrator as this can negatively affect your phones function.
14. Factory Reset - This setting is to configure and troubleshoot the network. You should not change this settings unless directed to by your Administrator as this can negatively affect your phones function. IMPORTANT: If you choose factory reset, you will return the phone to the original factory settings and will erase ALL current settings, including the directory and call logs. It is also possible that your phone extension will change.
15. Phone Password - This setting allows you to set or change the password for your phone, to prevent unauthorized use. To access this option, press the Setup button and 15. Press select to set or change your password, then press save. Enter up to a 12 character password. You will be required to enter the same password twice.
16. LCD Contrast - This setting allows you adjust the contrast of the LCD screen. To access this option, press the Setup button and 15. Press select, then use the navigation button to adjust the screen contrast. Press save to confirm your choice. Moving the navigation button to the left will increase the contrast and to the right will decrease the contrast,
17. Call Park Status - See the status of a call that has been parked.
ming call. The line can be configured as a unique phone number (or extension), or can be configured to share a number that is assigned to multiple phones.
Comprehensive Interoperability and SIP Based Feature Set
Based on the SIP standard, the SPA921 has been tested to ensure comprehensive interoperability with equipment from VoIP infrastructure leaders enabling service providers to quickly roll-out competitive, feature rich services to their customers. With hundreds of features and configurable service parameters, the SPA921 addresses the requirements of traditional business users while leveraging the advantages of IP telephony. Features such as easy station moves, presence, and shared line appearances (across local and geographically dispersed locations) are just some of the many advantages of the SPA921.
Carrier-Grade Security, Provisioning, and Management
The SPA921 uses standard encryption protocols to provide secure remote provisioning and unobtrusive in-service software upgrades. Linksys secure remote provisioning tools include detailed performance measurement and troubleshooting features, enabling network providers to deliver high quality support to their subscribers. Remote provisioning also saves service providers the hassle and expense of managing, pre-loading, and re-configuring customer premise equipment (CPE).
Installation
Notes:
Here is a quick step by step installation of Linksys SPA921:
Asterisk Configuration
Before going further reading this tutorial make sure you have asterisk server and you are familiar with adding users to asterisk. If you are not aware of this issue you can read the tutorial explaining how to add new users to asterisk.
Linksys SPA921 is working with the SIP (Session Initiation Protocol). You will have to create a SIP user. Open /etc/asterisk/sip.conf and add the user at the bottom at the file.
Then reload Asterisk's sip configuration by executing the command `asterisk -rx "sip reload"`.
At one point we will want to receive calls on our phone, that's why we have to create an extension for this. We will achieve this by adding extension `1001` in our default context in extensions.conf configuration file, located at /etc/asterisk
If you meet some troubles with Asterisk configuration, you might want to check the configuration files used in this test:
Initialization
When you power up the phone it will start up. It will boot its operational system. When its ready you will be able to press the options button (the one which looks like page). In order to operate with the phone you will have to configure some options.
Network - network options are the the ninth option. Use the navigation buttons and press Select.
SIP Options - in order to configure the account on the phone you will have to use the web-interface. In order to have access to it you will need to configure you network settings and enable the web interface from the phone menus (it is enabled by default). Type the IP address in your browser and enter into administration mode by clicking `Admin Mode`. You will be prompted for password if you have set such. Then go to Ext 1 tab as is shown below.
This is the location where you can configure your account.
Now you are ready to use your Linksys SPA921. In the next pages you will find some advances options and configurations of the hard phone.
Using the Web interface
Most of the options are accessible through the web configuration interface. In order to access the web interface you will need a correctly configured network. An example is shown on the previous page.
The web interface is divided into seven tabs. Every tab gives different information. Here are the seven tabs:

The first tab named `Info` will show you different information for your hardphone.
The second tab named `System` will allow you to reconfigure hardphone's network configuration.
The third tab named `SIP` will allow you the configure some advanced SIP options
The fourth tab named `Regional` will allow you to configure some Regional settings as well as the service activation and deactivation codes
From the fifth tab named `Phone` you will be able to set some settings concerning the user such as sounds, naming, logos, etc...
From the sixth tab named `Ext 1` you will be able to set the SIP settings for Ext 1 (actually the only one)
From the last tab named `User` you will be able to set additional user options such as Call Forwarding, Speed Dialing and Audio settings.
Using Phone Menus
1. Directory - To view your phones directory options, press the Setup button, then 1, then the soft button under select.
2. Speed Dial - Enter up to 8 speed dial numbers. Each one can be a phone number, IP address or URL. To setup or edit Speed Dial, press the Setup button, then 2.
3. Call History - You can view lists of recently received (up to 60) incoming calls in Call History. Choose from Redial List, Answered Calls or Missed Calls. To view the phones Call History lists, press the Setup button, then 3. To review a list, use the navigation button to highlight it and press select. To redial a number from the list, press dial. You can also choose to delete, edit or cancel entries from these lists.
4. Ring Tone - Each extension of your phone can have a different ring tone. You can download up to 10 ring tones at Linksys.com To change a ring tone, press the Setup button, then 4. Use the navigation button to highlight the extension you want to change the ring tone for and press change. You will see several choices. Press play to hear the tone, press select to choose it.
5. Preferences - You can set six different preferences for your phone. To select a preference, press the Setup button, then 5.Use the navigation button to highlight the preference to change, then press the soft button under edit.
6. Call Forward - You can forward all calls, calls when the phone is busy or calls when there is no answer: To change a ring tone, press the Setup button, then 6. Use the navigation button to highlight the call forwarding feature that you want to use.
8. Voice Mail - Voice mail service must be available on your network, to use this feature. To access your voice mail box, press the Setup button, then 8. Enter the extension number for the phones voice mail box, then select save. Your Phone Administrator can provide this number to you.
9. Network - network options were already described in the previous page.
10. Product Info - This setting displays the product name, serial number, software version, hardware version, MAC address and Client Certificate.
11. Status - This setting displays the status of the phone, extension and line buttons.
12. Reboot - This setting is to configure and troubleshoot the network. You should not change this settings unless directed to by your Administrator as this can negatively affect your phones function.
13. Restart - This setting is to configure and troubleshoot the network. You should not change this settings unless directed to by your Administrator as this can negatively affect your phones function.
14. Factory Reset - This setting is to configure and troubleshoot the network. You should not change this settings unless directed to by your Administrator as this can negatively affect your phones function. IMPORTANT: If you choose factory reset, you will return the phone to the original factory settings and will erase ALL current settings, including the directory and call logs. It is also possible that your phone extension will change.
15. Phone Password - This setting allows you to set or change the password for your phone, to prevent unauthorized use. To access this option, press the Setup button and 15. Press select to set or change your password, then press save. Enter up to a 12 character password. You will be required to enter the same password twice.
16. LCD Contrast - This setting allows you adjust the contrast of the LCD screen. To access this option, press the Setup button and 15. Press select, then use the navigation button to adjust the screen contrast. Press save to confirm your choice. Moving the navigation button to the left will increase the contrast and to the right will decrease the contrast,
17. Call Park Status - See the status of a call that has been parked.
Standard features on the SPA921 include a high resolution graphical display, speakerphone, and a 2.5 mm head-set port. The SPA921 supports one line with two call appearances and provides support for three way conferencing, attended call transfer, and placing a call on hold to answer another one.
Features
Standard features on the SPA921 include a high resolution graphical display, speakerphone, and a 2.5 mm head-set port. The SPA921 supports one line with two call appearances and provides support for three way conferencing, attended call transfer, and placing a call on hold to answer an incoming call. The line can be configured as a unique phone number (or extension), or can be configured to share a number that is assigned to multiple phones.
* Full featured one SIP line business class IP Phone
* Connect directly to an Internet Telephone Service Provider or connect to an IP PBX
* Speakerphone. Caller ID. Call Hold, Transfer, Conferencing, and more
* High resolution graphical display
* Connect directly to an Internet Telephone Service Provider or connect to an IP PBX
* Speakerphone. Caller ID. Call Hold, Transfer, Conferencing, and more
* High resolution graphical display
Comprehensive Interoperability and SIP Based Feature Set
Based on the SIP standard, the SPA921 has been tested to ensure comprehensive interoperability with equipment from VoIP infrastructure leaders enabling service providers to quickly roll-out competitive, feature rich services to their customers. With hundreds of features and configurable service parameters, the SPA921 addresses the requirements of traditional business users while leveraging the advantages of IP telephony. Features such as easy station moves, presence, and shared line appearances (across local and geographically dispersed locations) are just some of the many advantages of the SPA921.
Carrier-Grade Security, Provisioning, and Management
The SPA921 uses standard encryption protocols to provide secure remote provisioning and unobtrusive in-service software upgrades. Linksys secure remote provisioning tools include detailed performance measurement and troubleshooting features, enabling network providers to deliver high quality support to their subscribers. Remote provisioning also saves service providers the hassle and expense of managing, pre-loading, and re-configuring customer premise equipment (CPE).
Installation
Notes:
a. The Linksys SPA921 should be placed on horizontal surface.
b. Use the external power supply that is included in the package. Other power supplies may cause damage to the phone, affect the behavior or induce noise.
b. Use the external power supply that is included in the package. Other power supplies may cause damage to the phone, affect the behavior or induce noise.
Here is a quick step by step installation of Linksys SPA921:
1. Put the stand of the phone
2. Plug the one end of the handset's cable into the phone and the other into the handset itself.
3. Plug your Internet cable into the port with label 'Net'.
4. Power up the phone by plugging the power supply into the phone.
5. If you have headset plug it into the port with 'headset' image above it.
Note: Note that point 5 is optional.
Asterisk Configuration
Before going further reading this tutorial make sure you have asterisk server and you are familiar with adding users to asterisk. If you are not aware of this issue you can read the tutorial explaining how to add new users to asterisk.
Linksys SPA921 is working with the SIP (Session Initiation Protocol). You will have to create a SIP user. Open /etc/asterisk/sip.conf and add the user at the bottom at the file.
[mytest]
username=mytest
secret=mytest
type=friend
host=dynamic
context=default
username=mytest
secret=mytest
type=friend
host=dynamic
context=default
Then reload Asterisk's sip configuration by executing the command `asterisk -rx "sip reload"`.
At one point we will want to receive calls on our phone, that's why we have to create an extension for this. We will achieve this by adding extension `1001` in our default context in extensions.conf configuration file, located at /etc/asterisk
[default]
exten => 1001,1,Dial(SIP/mytest,20)
exten => 1001,n,HangUp()
Of course we will have to reload our asterisk extension configuration in order the changes to take effect. We can easily achieve this by typing `asterisk -rx "extensions reload"`exten => 1001,1,Dial(SIP/mytest,20)
exten => 1001,n,HangUp()
If you meet some troubles with Asterisk configuration, you might want to check the configuration files used in this test:
Initialization
When you power up the phone it will start up. It will boot its operational system. When its ready you will be able to press the options button (the one which looks like page). In order to operate with the phone you will have to configure some options.
Network - network options are the the ninth option. Use the navigation buttons and press Select.
DHCP Enable - you can configure if the DHCP service is enabled or not. In order to configure this, press the Edit button.
Current IP - this shows the current IP address of the phone.
Hostname - this shows the current hostname of the phone.
Domain - this shows the current domain of the phone.
Current Netmask - this shows the current network mask.
Current Gateway - this shows the current gateway.
Enable Web Server - by using the option you can configure if the web configuration is active or not
Non-DHCP IP Address - by using this option you can set static IP address. Press the Edit button and enter a valid IP address. The asterisk (*) is used for dot.
Non-DHCP-Subnet Mask - by using this option you can set static network mask. Press the Edit button and enter a valid network mask. The asterisk (*) is used for dot.
Non-DHCP Default Route - by using this option you can set static gateway. Press the Edit button and enter a valid IP address. The asterisk (*) is used for dot.
Non-DHCP DNS1 - by using this option you can set static primary DNS server. Press the Edit button and enter a valid IP address. The asterisk (*) is used for dot.
Non-DHCP DNS2 - by using this option you can set static secondary DNS server. Press the Edit button and enter a valid IP address. The asterisk (*) is used for dot.
Non-DHCP NTP Server1 - by using this option you can set static primary NTP server. Press the Edit button and enter a valid IP address. The asterisk (*) is used for dot.
Non-DHCP NTP Server2 - by using this option you can set static secondary NTP server. Press the Edit button and enter a valid IP address. The asterisk (*) is used for dot.
Multicast Address - by using this option you can set static multicast Address. Press the Edit button and enter a valid IP address. The asterisk (*) is used for dot.
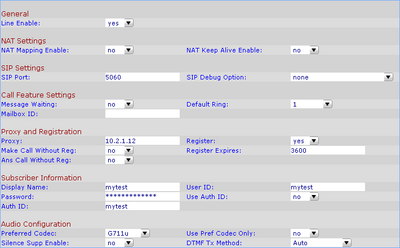
SIP Options - in order to configure the account on the phone you will have to use the web-interface. In order to have access to it you will need to configure you network settings and enable the web interface from the phone menus (it is enabled by default). Type the IP address in your browser and enter into administration mode by clicking `Admin Mode`. You will be prompted for password if you have set such. Then go to Ext 1 tab as is shown below.

This is the location where you can configure your account.
Enable the line by selecting `Line Enable` option to yes
Check if there is NAT between your hard phone and the Asterisk server and if so set appropriate NAT options
If you are debugging set Debug mode
Enter the IP address or the hostname of your Asterisk server on the `Proxy` setting
Set `User ID` and `Auth ID` to the account name of the SIP account that you created
Set the password for the account
Select appropriate audio codec
To apply changes press `Submit All Changes` button and reboot the phone.

Now you are ready to use your Linksys SPA921. In the next pages you will find some advances options and configurations of the hard phone.
Using the Web interface
Most of the options are accessible through the web configuration interface. In order to access the web interface you will need a correctly configured network. An example is shown on the previous page.
The web interface is divided into seven tabs. Every tab gives different information. Here are the seven tabs:

The first tab named `Info` will show you different information for your hardphone.
* System Information - this part will give you detailed info for your network configuration such as DHCP info, Current IP, Hostname, Domain, Current Netmask, Current Gateway, Primary and Secondary DNS.
* Product Information - this part will give you detailed info for your product such as - Product Name, Serial Number, Software & Hardware Version, MAC Address, Client Certificate and Licenses.
* Phone Status - this part will give you info on some of the phone statistics such as - Current Time, Uptime, Broadcast, RTP & SIP Packets Statistics
* Ext 1 Status - this part will give you information on registration status of the phone - Registration State, Last Registration Time, Next Registration Timing, Message Waiting, Mapped SIP Port
* Line 1 Call 1 Status - this part will give you detailed information on current call that is been made through Line 1. Info includes: Call State, Tone, Encoder & Decoder, Type, Hold, Callback, Peer's Name & Phone, Duration, Packets Sent & Received, Bytes Sent & Received, Decode Latency, Jitter, Round Trip Delay, Packets Lost, Packet Error, Mapped RTP Port
* Line 1 Call 2 Status - this part will give you detailed information on current call that is been made through Line 1. Info includes: Call State, Tone, Encoder & Decoder, Type, Hold, Callback, Peer's Name & Phone, Duration, Packets Sent & Received, Bytes Sent & Received, Decode Latency, Jitter, Round Trip Delay, Packets Lost, Packet Error, Mapped RTP Port
The second tab named `System` will allow you to reconfigure hardphone's network configuration.
* System Configuration - from this part you will be able to set the user's password and Web Server status (Enabled/Disabled)
* Internet Connection Type - from this part you will be able to set basic network options such as - DHCP, Static IP, Network Mask and Gateway
* Optional Network Configuration - from this part you will be able to set additional network options such as - HostName, Domain, Primary & Secondary DNS, DNS Query Mode, Syslog & Debug Server, Debug Level
The third tab named `SIP` will allow you the configure some advanced SIP options
* Response Status Code Handling - this page will allow you to set the code value for SIT1 RSC, SIT2 RSC, SIT3 RSC and SIT4 RSC
* RTP Parameters - this page will allow you to set the port range for RTP.
* SDP Payload Types - this page will allow you to set payload values for: AVT Dynamic Payload, G726r16 Dynamic Payload, G726r24 Dynamic Payload, G726r40 Dynamic Payload, G729b Dynamic Payload
* RTP Parameters - this page will allow you to set the port range for RTP.
* SDP Payload Types - this page will allow you to set payload values for: AVT Dynamic Payload, G726r16 Dynamic Payload, G726r24 Dynamic Payload, G726r40 Dynamic Payload, G729b Dynamic Payload
The fourth tab named `Regional` will allow you to configure some Regional settings as well as the service activation and deactivation codes
* Control Timer Values - this part will allow you to set the timing in seconds for the following services: Call Back Expires and Call Back Retry Interval
* Vertical Service Activation Codes - this page will allow you to set the codes for some of the services - Call Return, Blind Transfer, Call Back Activation & Deactivation, Call Forward All Activation & Deactivation, Call Forward Busy Activation & Deactivation, Call Forward No Answer Activation & Deactivation, Block CallerID Activation & Deactivation, Block CallerID Per Call Activation & Deactivation, Block ANC Activation & Deactivation and DND Activation & Deactivation
* Miscellaneous - from this part you will be able to set some regional settings such as - Local Date, Local Time, Time Zone and Time Offset
From the fifth tab named `Phone` you will be able to set some settings concerning the user such as sounds, naming, logos, etc...
* General - from this part you will be able to set some basic customization such as: Station Name, Voice Mail Number and Text Logo
* Ring Tone - from this part you will be able to set ten custom ringing types
* Audio Input Gain - from this part you will be able to set some options that will alter the gain of sound for the different microphones. This includes - Handset, Headset and Speakerphone. You will be able to set plus/minus six dB on each of them
From the sixth tab named `Ext 1` you will be able to set the SIP settings for Ext 1 (actually the only one)
* General - from this part you will be able to set if the Line is Enabled or Not
* NAT Settings - from this part you will be able to set if the NAT Mapping and NAT Keep Alive are Enabled or Not
* SIP Settings - from this part you will be able to set custom SIP Port and SIP Debug Options
* Call Feature Settings - from this part you will be able to set Message Waiting, Default Ringing and the Mailbox ID
* Proxy and Registration - from this part you will be able to set SIP Proxy Server (the IP address or hostname of the Asterisk server), Register Expiration Timing as well as Making and Receiving Calls Without Registration
* Subscriber Information - from this part you will be able to set you SIP account settings such as: Display Name, User ID, Password and Auth ID
* Audio Configuration - from this part you will be able to set some audio settings such as Preferred Codec, Usage of Different Codecs, Silence Suppression and DTMF Tx Method
From the last tab named `User` you will be able to set additional user options such as Call Forwarding, Speed Dialing and Audio settings.
* Call Forward - from this part you can set user customizations which concerns call forwarding and dialing - Call Forward All Destination, Call Forward Busy Destination, Call Forward No Answer Destination, Call Forward No Answer Delay, Speed Dial numbers (2 to 9)
* Supplementary Services - from this part you can set miscellaneous user options such as: Block CallerID, Block ANC, DND, Secure Call, Dial Assistance, Auto Answer Page, Preferred Audio Device, Time Format, Date Format
* Audio Volume - from this part you can audio volume for: Ringer, Speaker, Handset and Headset
Using Phone Menus
1. Directory - To view your phones directory options, press the Setup button, then 1, then the soft button under select.
Using the navigation button, move up or down to highlight a New Entry, Corporate Directory (if available) or Personal Directory. Adding a New Entry to Your Personal Directory (Setup button, 1,1) For numbers that you call often, you may want to set up a personal directory. Press the soft button under add. The last soft button feature allows you to choose num, IP or URL. Use the dial pad to enter a phone number, IP address or URL, then press the soft button under OK, Use the navigation button to move up and down between entries. If you enter the wrong information, press delChr to delete one character at a time or clear to erase the entry. To copy an existing entry, use the navigation button to select an entry from your personal or corporate directory and press copy. Then go to your personal directory and press paste to enter the information. To select a specific ring one, move the navigation button to Ring: Default, then select feature and choose a tone Press save and the entry will be added to your personal directory. Using a Corporate Directory (Setup button, 1,2) A corporate directory is available only if the phone is hosted by a Linksys IP PBX system. To view the corporate directory, press the Setup button, then 1, 2, then the soft button under select. Use the navigation button to highlight a name, and you will see a list of choices. You can dial, cancel, copy or paste an entry by pressing the soft button beneath your choice. Using a Personal Directory (Setup button, 1,3) If you entered at least one name in New Entry, you have a personal directory. To view the directory, press the Setup button, then 1. Entries will be listed next to number 3. Use the navigation button to highlight your choice. You can dial, delete, edit, cancel, copy or paste an entry by pressing the soft button beneath your choice.
2. Speed Dial - Enter up to 8 speed dial numbers. Each one can be a phone number, IP address or URL. To setup or edit Speed Dial, press the Setup button, then 2.
To enter a new Speed Dial number, use the navigation button to move to a <Not Assigned> slot.
To edit a previously entered choice, highlight the entry with the navigation button.
Press the soft button under edit. The last soft button feature allows you to choose num, IP or URL. Use the number buttons to enter a phone number, IP address or URL, then press the soft button under OK, or enter a name from a directory. As you start to enter the name, you will see a list of choices. Highlight the number and press OK to save. If you enter the wrong information, before you press OK, press delChr to delete one character at a time or clear to erase the entry.To edit a previously entered choice, highlight the entry with the navigation button.
3. Call History - You can view lists of recently received (up to 60) incoming calls in Call History. Choose from Redial List, Answered Calls or Missed Calls. To view the phones Call History lists, press the Setup button, then 3. To review a list, use the navigation button to highlight it and press select. To redial a number from the list, press dial. You can also choose to delete, edit or cancel entries from these lists.
4. Ring Tone - Each extension of your phone can have a different ring tone. You can download up to 10 ring tones at Linksys.com To change a ring tone, press the Setup button, then 4. Use the navigation button to highlight the extension you want to change the ring tone for and press change. You will see several choices. Press play to hear the tone, press select to choose it.
5. Preferences - You can set six different preferences for your phone. To select a preference, press the Setup button, then 5.Use the navigation button to highlight the preference to change, then press the soft button under edit.
5.1. Block Caller ID - Your phone number will not appear to the person you call. Choose yes or no (y/n). After making your choice, press OK.
5.2. Block Anonymous Call - Calls that do not show Caller ID are not received by your phone (this blocks ALL calls without Caller ID). Choose yes or no (y/n). After making your choice, press OK.
5.3. Do Not Disturb - Sends incoming calls to voice mail, or gives a busy signal, if voice mail is not available. Choose yes or no (y/n). After making your choice, press OK.
5.4. Secure Call - The active call is encrypted so that others cannot eavesdrop. Before trying to enable, ask your service provider if Secure Call is available, as the phone must have a mini certificate installed by your service provider. Choose yes or no (y/n). After making your choice, press OK. When you dial you will hear a tone before the call.
5.5. Dial Assistance - If you choose yes, when you place calls the LCD will display phone numbers based on the best matched entries in the Directory and Call History lists. To enable this choice select yes (y/n), then press OK. To disable this feature select no (y/n), then press OK. If enabled, when placing calls, use the navigation button to highlight a phone number on the LCD screen and press dial to complete the call. 6 Preferred Audio Device - Designates the headset or speaker phone as the preferred audio device when the handset is not used. Press feature once or twice to select headset or speaker phone. After making your choice, press OK.
6. Call Forward - You can forward all calls, calls when the phone is busy or calls when there is no answer: To change a ring tone, press the Setup button, then 6. Use the navigation button to highlight the call forwarding feature that you want to use.
6.1. CFWD All Number Forwards all calls to a single number. Select edit and then enter a number to forward all calls to. Choose your voice mail box, another extension or an outside line. If an outside phone, be sure to enter 10 digits (1+area code + seven digit number). Press ok to confirm. To stop forwarding all calls, press the Setup button, then 6. Use the navigation button to highlight 1 CFWD All Number. Select edit and clear.
6.2. CFWD Busy Number Forwards calls to another number when the phone is busy. Select edit and then enter a number to forward calls to when your phone is busy. Choose your voice mail box, another extension or an outside phone. If an outside line, be sure to enter 10 digits (1+area code + seven digit number). Press ok to confirm. To stop forwarding calls, press the Setup button, then 6. Use the navigation button to highlight 2 CFWD Busy Number. Select edit and clear.
6.3. CFWD No Ans Number Forwards calls to another number if there's no answer at your phone. Select edit and then enter a number to forward calls to when there is no answer at your phone. Choose your voice mail box, another extension or an outside phone. If an outside line, be sure to enter 10 digits (1+area code + seven digit number). Press ok to confirm. To stop forwarding calls, select Call Forward from Setup then highlight 3 CFWD No Ans Number. Select edit and clear.
6.4. CFWD No Ans Delay Forwards calls to the number you selected in 3 (CFWD No Ans Number) after a time delay, if there is no answer at your phone. To enable this option, enter the number of seconds that will elapse before the call will be forwarded. Select edit, enter the number of seconds for the delay (up to 999) and then press ok. Press ok to confirm. To stop forwarding calls, select Call Forward from Setup then highlight 4 CFWD No Ans Delay. Select edit and clear.
7. Time/Date - Use this feature to enter the correct time, date and am or pm. To change the time or date, press the Setup button, then 7. Enter the date in the following format: mm*dd*yy (this will display as m/d) Enter the time in the following format: hh*mm*ss (this will display as (h:mm) If the time does not display am (a) or pm (p) correctly, you can adjust with Offset. To change from a.m. to p.m., enter *12*00*00, to change from p.m. to a.m., enter #12*00*00. Press the soft button under save to confirm your choice. You can set just one of these choices, if necessary.6.2. CFWD Busy Number Forwards calls to another number when the phone is busy. Select edit and then enter a number to forward calls to when your phone is busy. Choose your voice mail box, another extension or an outside phone. If an outside line, be sure to enter 10 digits (1+area code + seven digit number). Press ok to confirm. To stop forwarding calls, press the Setup button, then 6. Use the navigation button to highlight 2 CFWD Busy Number. Select edit and clear.
6.3. CFWD No Ans Number Forwards calls to another number if there's no answer at your phone. Select edit and then enter a number to forward calls to when there is no answer at your phone. Choose your voice mail box, another extension or an outside phone. If an outside line, be sure to enter 10 digits (1+area code + seven digit number). Press ok to confirm. To stop forwarding calls, select Call Forward from Setup then highlight 3 CFWD No Ans Number. Select edit and clear.
6.4. CFWD No Ans Delay Forwards calls to the number you selected in 3 (CFWD No Ans Number) after a time delay, if there is no answer at your phone. To enable this option, enter the number of seconds that will elapse before the call will be forwarded. Select edit, enter the number of seconds for the delay (up to 999) and then press ok. Press ok to confirm. To stop forwarding calls, select Call Forward from Setup then highlight 4 CFWD No Ans Delay. Select edit and clear.
8. Voice Mail - Voice mail service must be available on your network, to use this feature. To access your voice mail box, press the Setup button, then 8. Enter the extension number for the phones voice mail box, then select save. Your Phone Administrator can provide this number to you.
9. Network - network options were already described in the previous page.
10. Product Info - This setting displays the product name, serial number, software version, hardware version, MAC address and Client Certificate.
11. Status - This setting displays the status of the phone, extension and line buttons.
12. Reboot - This setting is to configure and troubleshoot the network. You should not change this settings unless directed to by your Administrator as this can negatively affect your phones function.
13. Restart - This setting is to configure and troubleshoot the network. You should not change this settings unless directed to by your Administrator as this can negatively affect your phones function.
14. Factory Reset - This setting is to configure and troubleshoot the network. You should not change this settings unless directed to by your Administrator as this can negatively affect your phones function. IMPORTANT: If you choose factory reset, you will return the phone to the original factory settings and will erase ALL current settings, including the directory and call logs. It is also possible that your phone extension will change.
15. Phone Password - This setting allows you to set or change the password for your phone, to prevent unauthorized use. To access this option, press the Setup button and 15. Press select to set or change your password, then press save. Enter up to a 12 character password. You will be required to enter the same password twice.
16. LCD Contrast - This setting allows you adjust the contrast of the LCD screen. To access this option, press the Setup button and 15. Press select, then use the navigation button to adjust the screen contrast. Press save to confirm your choice. Moving the navigation button to the left will increase the contrast and to the right will decrease the contrast,
17. Call Park Status - See the status of a call that has been parked.
ming call. The line can be configured as a unique phone number (or extension), or can be configured to share a number that is assigned to multiple phones.
* Full featured one SIP line business class IP Phone
* Connect directly to an Internet Telephone Service Provider or connect to an IP PBX
* Speakerphone. Caller ID. Call Hold, Transfer, Conferencing, and more
* High resolution graphical display
* Connect directly to an Internet Telephone Service Provider or connect to an IP PBX
* Speakerphone. Caller ID. Call Hold, Transfer, Conferencing, and more
* High resolution graphical display
Comprehensive Interoperability and SIP Based Feature Set
Based on the SIP standard, the SPA921 has been tested to ensure comprehensive interoperability with equipment from VoIP infrastructure leaders enabling service providers to quickly roll-out competitive, feature rich services to their customers. With hundreds of features and configurable service parameters, the SPA921 addresses the requirements of traditional business users while leveraging the advantages of IP telephony. Features such as easy station moves, presence, and shared line appearances (across local and geographically dispersed locations) are just some of the many advantages of the SPA921.
Carrier-Grade Security, Provisioning, and Management
The SPA921 uses standard encryption protocols to provide secure remote provisioning and unobtrusive in-service software upgrades. Linksys secure remote provisioning tools include detailed performance measurement and troubleshooting features, enabling network providers to deliver high quality support to their subscribers. Remote provisioning also saves service providers the hassle and expense of managing, pre-loading, and re-configuring customer premise equipment (CPE).
Installation
Notes:
a. The Linksys SPA921 should be placed on horizontal surface.
b. Use the external power supply that is included in the package. Other power supplies may cause damage to the phone, affect the behavior or induce noise.
b. Use the external power supply that is included in the package. Other power supplies may cause damage to the phone, affect the behavior or induce noise.
Here is a quick step by step installation of Linksys SPA921:
1. Put the stand of the phone
2. Plug the one end of the handset's cable into the phone and the other into the handset itself.
3. Plug your Internet cable into the port with label 'Net'.
4. Power up the phone by plugging the power supply into the phone.
5. If you have headset plug it into the port with 'headset' image above it.
Note: Note that point 5 is optional.
2. Plug the one end of the handset's cable into the phone and the other into the handset itself.
3. Plug your Internet cable into the port with label 'Net'.
4. Power up the phone by plugging the power supply into the phone.
5. If you have headset plug it into the port with 'headset' image above it.
Note: Note that point 5 is optional.
Asterisk Configuration
Before going further reading this tutorial make sure you have asterisk server and you are familiar with adding users to asterisk. If you are not aware of this issue you can read the tutorial explaining how to add new users to asterisk.
Linksys SPA921 is working with the SIP (Session Initiation Protocol). You will have to create a SIP user. Open /etc/asterisk/sip.conf and add the user at the bottom at the file.
[mytest]
username=mytest
secret=mytest
type=friend
host=dynamic
context=default
username=mytest
secret=mytest
type=friend
host=dynamic
context=default
Then reload Asterisk's sip configuration by executing the command `asterisk -rx "sip reload"`.
At one point we will want to receive calls on our phone, that's why we have to create an extension for this. We will achieve this by adding extension `1001` in our default context in extensions.conf configuration file, located at /etc/asterisk
[default]
exten => 1001,1,Dial(SIP/mytest,20)
exten => 1001,n,HangUp()
Of course we will have to reload our asterisk extension configuration in order the changes to take effect. We can easily achieve this by typing `asterisk -rx "extensions reload"`exten => 1001,1,Dial(SIP/mytest,20)
exten => 1001,n,HangUp()
If you meet some troubles with Asterisk configuration, you might want to check the configuration files used in this test:
Initialization
When you power up the phone it will start up. It will boot its operational system. When its ready you will be able to press the options button (the one which looks like page). In order to operate with the phone you will have to configure some options.
Network - network options are the the ninth option. Use the navigation buttons and press Select.
DHCP Enable - you can configure if the DHCP service is enabled or not. In order to configure this, press the Edit button.
Current IP - this shows the current IP address of the phone.
Hostname - this shows the current hostname of the phone.
Domain - this shows the current domain of the phone.
Current Netmask - this shows the current network mask.
Current Gateway - this shows the current gateway.
Enable Web Server - by using the option you can configure if the web configuration is active or not
Non-DHCP IP Address - by using this option you can set static IP address. Press the Edit button and enter a valid IP address. The asterisk (*) is used for dot.
Non-DHCP-Subnet Mask - by using this option you can set static network mask. Press the Edit button and enter a valid network mask. The asterisk (*) is used for dot.
Non-DHCP Default Route - by using this option you can set static gateway. Press the Edit button and enter a valid IP address. The asterisk (*) is used for dot.
Non-DHCP DNS1 - by using this option you can set static primary DNS server. Press the Edit button and enter a valid IP address. The asterisk (*) is used for dot.
Non-DHCP DNS2 - by using this option you can set static secondary DNS server. Press the Edit button and enter a valid IP address. The asterisk (*) is used for dot.
Non-DHCP NTP Server1 - by using this option you can set static primary NTP server. Press the Edit button and enter a valid IP address. The asterisk (*) is used for dot.
Non-DHCP NTP Server2 - by using this option you can set static secondary NTP server. Press the Edit button and enter a valid IP address. The asterisk (*) is used for dot.
Multicast Address - by using this option you can set static multicast Address. Press the Edit button and enter a valid IP address. The asterisk (*) is used for dot.
Current IP - this shows the current IP address of the phone.
Hostname - this shows the current hostname of the phone.
Domain - this shows the current domain of the phone.
Current Netmask - this shows the current network mask.
Current Gateway - this shows the current gateway.
Enable Web Server - by using the option you can configure if the web configuration is active or not
Non-DHCP IP Address - by using this option you can set static IP address. Press the Edit button and enter a valid IP address. The asterisk (*) is used for dot.
Non-DHCP-Subnet Mask - by using this option you can set static network mask. Press the Edit button and enter a valid network mask. The asterisk (*) is used for dot.
Non-DHCP Default Route - by using this option you can set static gateway. Press the Edit button and enter a valid IP address. The asterisk (*) is used for dot.
Non-DHCP DNS1 - by using this option you can set static primary DNS server. Press the Edit button and enter a valid IP address. The asterisk (*) is used for dot.
Non-DHCP DNS2 - by using this option you can set static secondary DNS server. Press the Edit button and enter a valid IP address. The asterisk (*) is used for dot.
Non-DHCP NTP Server1 - by using this option you can set static primary NTP server. Press the Edit button and enter a valid IP address. The asterisk (*) is used for dot.
Non-DHCP NTP Server2 - by using this option you can set static secondary NTP server. Press the Edit button and enter a valid IP address. The asterisk (*) is used for dot.
Multicast Address - by using this option you can set static multicast Address. Press the Edit button and enter a valid IP address. The asterisk (*) is used for dot.
SIP Options - in order to configure the account on the phone you will have to use the web-interface. In order to have access to it you will need to configure you network settings and enable the web interface from the phone menus (it is enabled by default). Type the IP address in your browser and enter into administration mode by clicking `Admin Mode`. You will be prompted for password if you have set such. Then go to Ext 1 tab as is shown below.
This is the location where you can configure your account.
Enable the line by selecting `Line Enable` option to yes
Check if there is NAT between your hard phone and the Asterisk server and if so set appropriate NAT options
If you are debugging set Debug mode
Enter the IP address or the hostname of your Asterisk server on the `Proxy` setting
Set `User ID` and `Auth ID` to the account name of the SIP account that you created
Set the password for the account
Select appropriate audio codec
To apply changes press `Submit All Changes` button and reboot the phone.
Check if there is NAT between your hard phone and the Asterisk server and if so set appropriate NAT options
If you are debugging set Debug mode
Enter the IP address or the hostname of your Asterisk server on the `Proxy` setting
Set `User ID` and `Auth ID` to the account name of the SIP account that you created
Set the password for the account
Select appropriate audio codec
To apply changes press `Submit All Changes` button and reboot the phone.
Now you are ready to use your Linksys SPA921. In the next pages you will find some advances options and configurations of the hard phone.
Using the Web interface
Most of the options are accessible through the web configuration interface. In order to access the web interface you will need a correctly configured network. An example is shown on the previous page.
The web interface is divided into seven tabs. Every tab gives different information. Here are the seven tabs:

The first tab named `Info` will show you different information for your hardphone.
* System Information - this part will give you detailed info for your network configuration such as DHCP info, Current IP, Hostname, Domain, Current Netmask, Current Gateway, Primary and Secondary DNS.
* Product Information - this part will give you detailed info for your product such as - Product Name, Serial Number, Software & Hardware Version, MAC Address, Client Certificate and Licenses.
* Phone Status - this part will give you info on some of the phone statistics such as - Current Time, Uptime, Broadcast, RTP & SIP Packets Statistics
* Ext 1 Status - this part will give you information on registration status of the phone - Registration State, Last Registration Time, Next Registration Timing, Message Waiting, Mapped SIP Port
* Line 1 Call 1 Status - this part will give you detailed information on current call that is been made through Line 1. Info includes: Call State, Tone, Encoder & Decoder, Type, Hold, Callback, Peer's Name & Phone, Duration, Packets Sent & Received, Bytes Sent & Received, Decode Latency, Jitter, Round Trip Delay, Packets Lost, Packet Error, Mapped RTP Port
* Line 1 Call 2 Status - this part will give you detailed information on current call that is been made through Line 1. Info includes: Call State, Tone, Encoder & Decoder, Type, Hold, Callback, Peer's Name & Phone, Duration, Packets Sent & Received, Bytes Sent & Received, Decode Latency, Jitter, Round Trip Delay, Packets Lost, Packet Error, Mapped RTP Port
* Product Information - this part will give you detailed info for your product such as - Product Name, Serial Number, Software & Hardware Version, MAC Address, Client Certificate and Licenses.
* Phone Status - this part will give you info on some of the phone statistics such as - Current Time, Uptime, Broadcast, RTP & SIP Packets Statistics
* Ext 1 Status - this part will give you information on registration status of the phone - Registration State, Last Registration Time, Next Registration Timing, Message Waiting, Mapped SIP Port
* Line 1 Call 1 Status - this part will give you detailed information on current call that is been made through Line 1. Info includes: Call State, Tone, Encoder & Decoder, Type, Hold, Callback, Peer's Name & Phone, Duration, Packets Sent & Received, Bytes Sent & Received, Decode Latency, Jitter, Round Trip Delay, Packets Lost, Packet Error, Mapped RTP Port
* Line 1 Call 2 Status - this part will give you detailed information on current call that is been made through Line 1. Info includes: Call State, Tone, Encoder & Decoder, Type, Hold, Callback, Peer's Name & Phone, Duration, Packets Sent & Received, Bytes Sent & Received, Decode Latency, Jitter, Round Trip Delay, Packets Lost, Packet Error, Mapped RTP Port
The second tab named `System` will allow you to reconfigure hardphone's network configuration.
* System Configuration - from this part you will be able to set the user's password and Web Server status (Enabled/Disabled)
* Internet Connection Type - from this part you will be able to set basic network options such as - DHCP, Static IP, Network Mask and Gateway
* Optional Network Configuration - from this part you will be able to set additional network options such as - HostName, Domain, Primary & Secondary DNS, DNS Query Mode, Syslog & Debug Server, Debug Level
* Internet Connection Type - from this part you will be able to set basic network options such as - DHCP, Static IP, Network Mask and Gateway
* Optional Network Configuration - from this part you will be able to set additional network options such as - HostName, Domain, Primary & Secondary DNS, DNS Query Mode, Syslog & Debug Server, Debug Level
The third tab named `SIP` will allow you the configure some advanced SIP options
* Response Status Code Handling - this page will allow you to set the code value for SIT1 RSC, SIT2 RSC, SIT3 RSC and SIT4 RSC
* RTP Parameters - this page will allow you to set the port range for RTP.
* SDP Payload Types - this page will allow you to set pauload values for: AVT Dynamic Paylad, G726r16 Dynamic Payload, G726r24 Dynamic Payload, G726r40 Dynamic Payload, G729b Dynamic Payload
* RTP Parameters - this page will allow you to set the port range for RTP.
* SDP Payload Types - this page will allow you to set pauload values for: AVT Dynamic Paylad, G726r16 Dynamic Payload, G726r24 Dynamic Payload, G726r40 Dynamic Payload, G729b Dynamic Payload
The fourth tab named `Regional` will allow you to configure some Regional settings as well as the service activation and deactivation codes
* Control Timer Values - this part will allow you to set the timing in seconds for the following services: Call Back Expires and Call Back Retry Interval
* Vertical Service Activation Codes - this page will allow you to set the codes for some of the services - Call Return, Blind Transfer, Call Back Activation & Deactivation, Call Forward All Activation & Deactivation, Call Forward Busy Activation & Deactivation, Call Forward No Answare Activation & Deactivation, Block CallerID Activation & Deactivation, Block CallID Per Call Activation & Deactivation, Block ANC Activation & Deactivation and DND Activation & Deactivation
* Miscellaneous - from this part you will be able to set some regional settings such as - Local Date, Local Time, Time Zone and Time Offset
From the fifth tab named `Phone` you will be able to set some settings concerning the user such as sounds, naming, logos, etc...
* General - from this part you will be able to set some basic customatization such as: Station Name, Voice Mail Number and Text Logo
* Ring Tone - from this part you will be able to set ten custom ringing types
* Audio Input Gain - from this part you will be able to set some options that will alter the gain of sound for the different microphones. This includes - Handset, Headset and Speakerphone. You will be able to set plus/minus six dB on each of them
From the sixth tab named `Ext 1` you will be able to set the SIP settings for Ext 1 (actually the only one)
* General - from this part you will be able to set if the Line is Enabled or Not
* NAT Settings - from this part you will be able to set if the NAT Mapping and NAT Keep Alive are Enabled or Not
* SIP Settings - from this part you will be able to set custom SIP Port and SIP Debug Options
* Call Feature Settings - from this part you will be able to set Message Waiting, Default Ringing and the Mailbox ID
* Proxy and Registration - from this part you will be able to set SIP Proxy Server (the IP address or hostname of the Asterisk server), Register Exparation Timing as well as Making and Receiving Calls Without Registration
* Subscriber Information - from this part you will be able to set you SIP account settings such as: Display Name, User ID, Password and Auth ID
* Audio Configuration - from this part you will be able to set some audio settings such as Preferred Codec, Usage of Different Codecs, Silence Suppresion and DTMF Tx Method
From the last tab named `User` you will be able to set additional user options such as Call Forwarding, Speed Dialing and Audio settings.
* Call Forward - from this part you can set user customatizations which concerns call forwarding and dialing - Call Forward All Destination, Call Forward Busy Destination, Call Forward No Answare Destination, Call Forward No Answer Delay, Speed Dial numbers (2 to 9)
* Supplementary Services - from this part you can set miscellaneous user options such as: Block CallerID, Block ANC, DND, Secure Call, Dial Assistance, Auto Answer Page, Preferred Audio Device, Time Format, Date Format
* Audio Volume - from this part you can audio volume for: Ringer, Speaker, Handset and Headset
Using Phone Menus
1. Directory - To view your phones directory options, press the Setup button, then 1, then the soft button under select.
Using the navigation button, move up or down to highlight a New Entry, Corporate Directory (if available) or Personal Directory. Adding a New Entry to Your Personal Directory (Setup button, 1,1) For numbers that you call often, you may want to set up a personal directory. Press the soft button under add. The last soft button feature allows you to choose num, IP or URL. Use the dial pad to enter a phone number, IP address or URL, then press the soft button under OK, Use the navigation button to move up and down between entries. If you enter the wrong information, press delChr to delete one character at a time or clear to erase the entry. To copy an existing entry, use the navigation button to select an entry from your personal or corporate directory and press copy. Then go to your personal directory and press paste to enter the information. To select a specific ring one, move the navigation button to Ring: Default, then select feature and choose a tone Press save and the entry will be added to your personal directory. Using a Corporate Directory (Setup button, 1,2) A corporate directory is available only if the phone is hosted by a Linksys IP PBX system. To view the corporate directory, press the Setup button, then 1, 2, then the soft button under select. Use the navigation button to highlight a name, and you will see a list of choices. You can dial, cancel, copy or paste an entry by pressing the soft button beneath your choice. Using a Personal Directory (Setup button, 1,3) If you entered at least one name in New Entry, you have a personal directory. To view the directory, press the Setup button, then 1. Entries will be listed next to number 3. Use the navigation button to highlight your choice. You can dial, delete, edit, cancel, copy or paste an entry by pressing the soft button beneath your choice.
2. Speed Dial - Enter up to 8 speed dial numbers. Each one can be a phone number, IP address or URL. To setup or edit Speed Dial, press the Setup button, then 2.
To enter a new Speed Dial number, use the navigation button to move to a <Not Assigned> slot.
To edit a previously entered choice, highlight the entry with the navigation button.
Press the soft button under edit. The last soft button feature allows you to choose num, IP or URL. Use the number buttons to enter a phone number, IP address or URL, then press the soft button under OK, or enter a name from a directory. As you start to enter the name, you will see a list of choices. Highlight the number and press OK to save. If you enter the wrong information, before you press OK, press delChr to delete one character at a time or clear to erase the entry.To edit a previously entered choice, highlight the entry with the navigation button.
3. Call History - You can view lists of recently received (up to 60) incoming calls in Call History. Choose from Redial List, Answered Calls or Missed Calls. To view the phones Call History lists, press the Setup button, then 3. To review a list, use the navigation button to highlight it and press select. To redial a number from the list, press dial. You can also choose to delete, edit or cancel entries from these lists.
4. Ring Tone - Each extension of your phone can have a different ring tone. You can download up to 10 ring tones at Linksys.com To change a ring tone, press the Setup button, then 4. Use the navigation button to highlight the extension you want to change the ring tone for and press change. You will see several choices. Press play to hear the tone, press select to choose it.
5. Preferences - You can set six different preferences for your phone. To select a preference, press the Setup button, then 5.Use the navigation button to highlight the preference to change, then press the soft button under edit.
5.1. Block Caller ID - Your phone number will not appear to the person you call. Choose yes or no (y/n). After making your choice, press OK.
5.2. Block Anonymous Call - Calls that do not show Caller ID are not received by your phone (this blocks ALL calls without Caller ID). Choose yes or no (y/n). After making your choice, press OK.
5.3. Do Not Disturb - Sends incoming calls to voice mail, or gives a busy signal, if voice mail is not available. Choose yes or no (y/n). After making your choice, press OK.
5.4. Secure Call - The active call is encrypted so that others cannot eavesdrop. Before trying to enable, ask your service provider if Secure Call is available, as the phone must have a mini certificate installed by your service provider. Choose yes or no (y/n). After making your choice, press OK. When you dial you will hear a tone before the call.
5.5. Dial Assistance - If you choose yes, when you place calls the LCD will display phone numbers based on the best matched entries in the Directory and Call History lists. To enable this choice select yes (y/n), then press OK. To disable this feature select no (y/n), then press OK. If enabled, when placing calls, use the navigation button to highlight a phone number on the LCD screen and press dial to complete the call. 6 Preferred Audio Device - Designates the headset or speaker phone as the preferred audio device when the handset is not used. Press feature once or twice to select headset or speaker phone. After making your choice, press OK.
5.2. Block Anonymous Call - Calls that do not show Caller ID are not received by your phone (this blocks ALL calls without Caller ID). Choose yes or no (y/n). After making your choice, press OK.
5.3. Do Not Disturb - Sends incoming calls to voice mail, or gives a busy signal, if voice mail is not available. Choose yes or no (y/n). After making your choice, press OK.
5.4. Secure Call - The active call is encrypted so that others cannot eavesdrop. Before trying to enable, ask your service provider if Secure Call is available, as the phone must have a mini certificate installed by your service provider. Choose yes or no (y/n). After making your choice, press OK. When you dial you will hear a tone before the call.
5.5. Dial Assistance - If you choose yes, when you place calls the LCD will display phone numbers based on the best matched entries in the Directory and Call History lists. To enable this choice select yes (y/n), then press OK. To disable this feature select no (y/n), then press OK. If enabled, when placing calls, use the navigation button to highlight a phone number on the LCD screen and press dial to complete the call. 6 Preferred Audio Device - Designates the headset or speaker phone as the preferred audio device when the handset is not used. Press feature once or twice to select headset or speaker phone. After making your choice, press OK.
6. Call Forward - You can forward all calls, calls when the phone is busy or calls when there is no answer: To change a ring tone, press the Setup button, then 6. Use the navigation button to highlight the call forwarding feature that you want to use.
6.1. CFWD All Number Forwards all calls to a single number. Select edit and then enter a number to forward all calls to. Choose your voice mail box, another extension or an outside line. If an outside phone, be sure to enter 10 digits (1+area code + seven digit number). Press ok to confirm. To stop forwarding all calls, press the Setup button, then 6. Use the navigation button to highlight 1 CFWD All Number. Select edit and clear.
6.2. CFWD Busy Number Forwards calls to another number when the phone is busy. Select edit and then enter a number to forward calls to when your phone is busy. Choose your voice mail box, another extension or an outside phone. If an outside line, be sure to enter 10 digits (1+area code + seven digit number). Press ok to confirm. To stop forwarding calls, press the Setup button, then 6. Use the navigation button to highlight 2 CFWD Busy Number. Select edit and clear.
6.3. CFWD No Ans Number Forwards calls to another number if there's no answer at your phone. Select edit and then enter a number to forward calls to when there is no answer at your phone. Choose your voice mail box, another extension or an outside phone. If an outside line, be sure to enter 10 digits (1+area code + seven digit number). Press ok to confirm. To stop forwarding calls, select Call Forward from Setup then highlight 3 CFWD No Ans Number. Select edit and clear.
6.4. CFWD No Ans Delay Forwards calls to the number you selected in 3 (CFWD No Ans Number) after a time delay, if there is no answer at your phone. To enable this option, enter the number of seconds that will elapse before the call will be forwarded. Select edit, enter the number of seconds for the delay (up to 999) and then press ok. Press ok to confirm. To stop forwarding calls, select Call Forward from Setup then highlight 4 CFWD No Ans Delay. Select edit and clear.
7. Time/Date - Use this feature to enter the correct time, date and am or pm. To change the time or date, press the Setup button, then 7. Enter the date in the following format: mm*dd*yy (this will display as m/d) Enter the time in the following format: hh*mm*ss (this will display as (h:mm) If the time does not display am (a) or pm (p) correctly, you can adjust with Offset. To change from a.m. to p.m., enter *12*00*00, to change from p.m. to a.m., enter #12*00*00. Press the soft button under save to confirm your choice. You can set just one of these choices, if necessary.6.2. CFWD Busy Number Forwards calls to another number when the phone is busy. Select edit and then enter a number to forward calls to when your phone is busy. Choose your voice mail box, another extension or an outside phone. If an outside line, be sure to enter 10 digits (1+area code + seven digit number). Press ok to confirm. To stop forwarding calls, press the Setup button, then 6. Use the navigation button to highlight 2 CFWD Busy Number. Select edit and clear.
6.3. CFWD No Ans Number Forwards calls to another number if there's no answer at your phone. Select edit and then enter a number to forward calls to when there is no answer at your phone. Choose your voice mail box, another extension or an outside phone. If an outside line, be sure to enter 10 digits (1+area code + seven digit number). Press ok to confirm. To stop forwarding calls, select Call Forward from Setup then highlight 3 CFWD No Ans Number. Select edit and clear.
6.4. CFWD No Ans Delay Forwards calls to the number you selected in 3 (CFWD No Ans Number) after a time delay, if there is no answer at your phone. To enable this option, enter the number of seconds that will elapse before the call will be forwarded. Select edit, enter the number of seconds for the delay (up to 999) and then press ok. Press ok to confirm. To stop forwarding calls, select Call Forward from Setup then highlight 4 CFWD No Ans Delay. Select edit and clear.
8. Voice Mail - Voice mail service must be available on your network, to use this feature. To access your voice mail box, press the Setup button, then 8. Enter the extension number for the phones voice mail box, then select save. Your Phone Administrator can provide this number to you.
9. Network - network options were already described in the previous page.
10. Product Info - This setting displays the product name, serial number, software version, hardware version, MAC address and Client Certificate.
11. Status - This setting displays the status of the phone, extension and line buttons.
12. Reboot - This setting is to configure and troubleshoot the network. You should not change this settings unless directed to by your Administrator as this can negatively affect your phones function.
13. Restart - This setting is to configure and troubleshoot the network. You should not change this settings unless directed to by your Administrator as this can negatively affect your phones function.
14. Factory Reset - This setting is to configure and troubleshoot the network. You should not change this settings unless directed to by your Administrator as this can negatively affect your phones function. IMPORTANT: If you choose factory reset, you will return the phone to the original factory settings and will erase ALL current settings, including the directory and call logs. It is also possible that your phone extension will change.
15. Phone Password - This setting allows you to set or change the password for your phone, to prevent unauthorized use. To access this option, press the Setup button and 15. Press select to set or change your password, then press save. Enter up to a 12 character password. You will be required to enter the same password twice.
16. LCD Contrast - This setting allows you adjust the contrast of the LCD screen. To access this option, press the Setup button and 15. Press select, then use the navigation button to adjust the screen contrast. Press save to confirm your choice. Moving the navigation button to the left will increase the contrast and to the right will decrease the contrast,
17. Call Park Status - See the status of a call that has been parked.
| Add Comment |
Latest Headlines:
-
T.38 faxing with Zoiper 2.15 is now easier than ever
section: voip software
-
Asterisk 1.4.21 Released
section: Asterisk
-
Asterisk 1.4.20 Released
section: Asterisk
-
Asterisk 1.4.20-rc2 Released
section: Asterisk
-
Asterisk 1.4.20-rc1 Now Available
section: Asterisk
- News Archives (older news)
Latest Tutorials:
-
Sending Fax from Zoiper to Zoiper using T.38
added 08/Dec/2008 18:16
-
VMAuthenticate (dialplan application)
added 01/Mar/2008 15:57
-
Siptronic ST-530
added 06/Nov/2007 17:57
-
Siemens C455 IP hardphone
added 05/Nov/2007 10:24
-
Zoiper
added 22/Oct/2007 17:53
Latest Comments:
-
https://www.boxingscene.com/forums/boxin...
tutorial: asterisk.conf
-
https://www.boxingscene.com/forums/boxin...
tutorial: asterisk.conf
-
https://run-for-them.raiselysite.com/qui...
tutorial: Request to schedule in the past?!?!
-
https://scream-7-full-movie-zh-sub.readm...
tutorial: Read (dialplan application)
-
sportwetten ohne oasis, [url=https://co...
tutorial: DrayTek Vigor 2900V - broadband security voip router