

3.2.25. Grandstream HandyTone-488
1. Introduction

2.Differences between HandyTone-488 and HandyTone-486
3. Product Features
4. Prerequisites
5. Asterisk PBX configuration
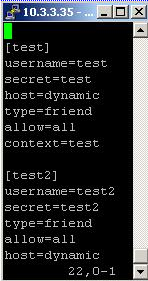
First, you need to register a user in the sip.conf file. In our case we are registering the user test, to use for line1 and user test2 for line2. You have to also set the password(secret) - in our case test for line1 and test2 for the second line.
Type=friend means that this user can make and receive calls. Secret=test and Secret=test2 - password test for line1 and test2 for line2. Host=dynamic means that the IP is not static but dynamic through a DHCP server. Allow=all means that the line which this user will use supports all audio codecs. Context=test - this shows that this user is working with the extensions in this context of the configuration file extensions.conf.
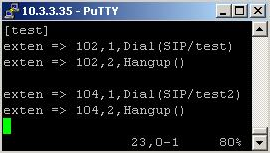
The first line in the context [test] shows that if somebody dials the number 102 his call will be connected with the user test through SIP. In our case this user is set for line 1. The next line says that if the conversation is over then Asterisk has to hang up the line.
Do the same if you want to use line 2. In our example we do this with the number 104. If somebody dials 104, his call will be connected with the user test2 through SIP. Again, its good to add an extension for a hanging up in order to be sure that when the conversation is over the Asterisk PBX will hang up the line. You can see a screenshot of extensions.conf below.
6. Configuration
From the telephone connected to the HandyTone-488, you can only do the basic settings. For the advanced settings you have to access the HandyTone-488 through the web interface.
To access the build-in configuration menu you have to enter the asterisk (***) three times.
Grandstream HandyTone-488 Menu:
The HandyTone-488 HTML configuration page can be accessed via LAN or WAN port:
From the LAN port:
There are admin and user accounts. The admin account is for changing the advanced settings, the user account is used for changing only the basic settings.
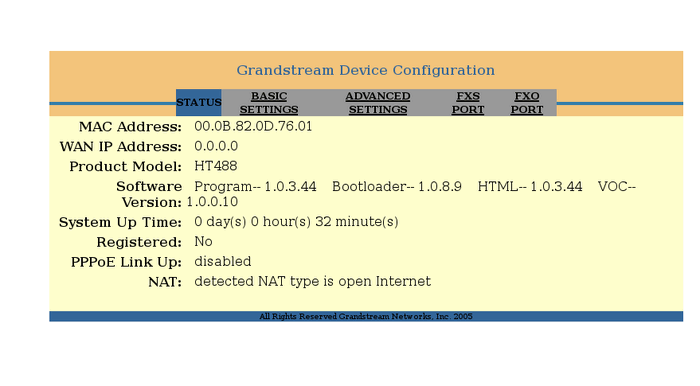
The first option is "STATUS". On this screen you can see statistics for the outgoing and incoming calls, what is the WAN IP Address for the device, etc.:

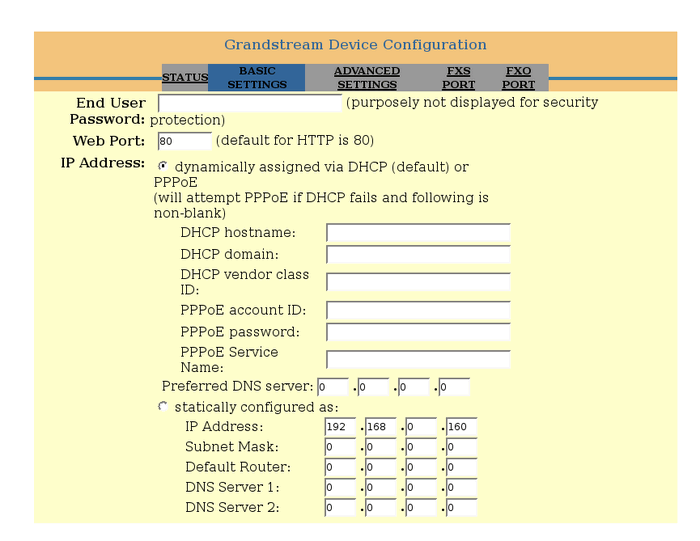
The second option is "Basic Settings". Here you can change the Web port, WAN port, timezone, NAT/DHCP settings, port forwarding, etc.:
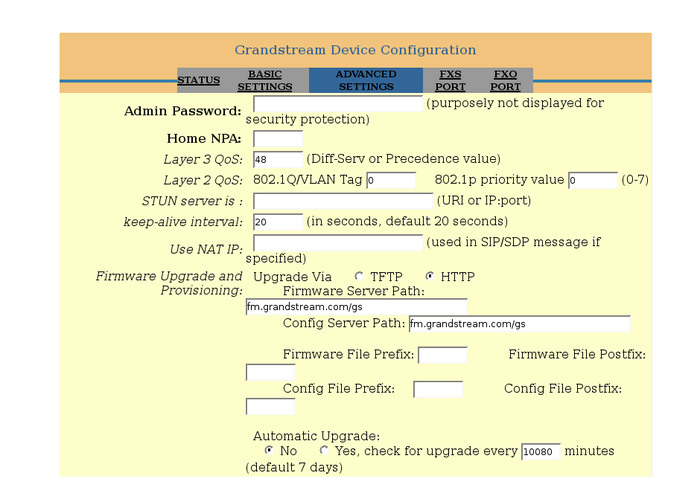
The third option is "Advanced Settings". Here you can change all advanced settings for HandyTone-488: Admin password, STUN Server, Firmware server path, Firmware way to upgrade, Firmware key, NTP Server hostname or IP Address, Syslog Server and Level for logging. Also here you can enable the access via WAN, which is disabled by default. The option is: "WAN side http access - No or Yes".
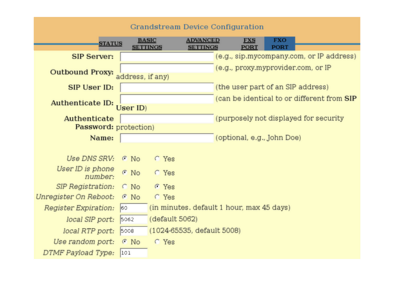
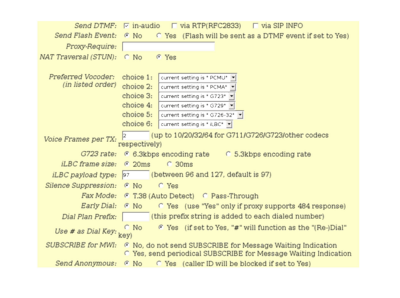
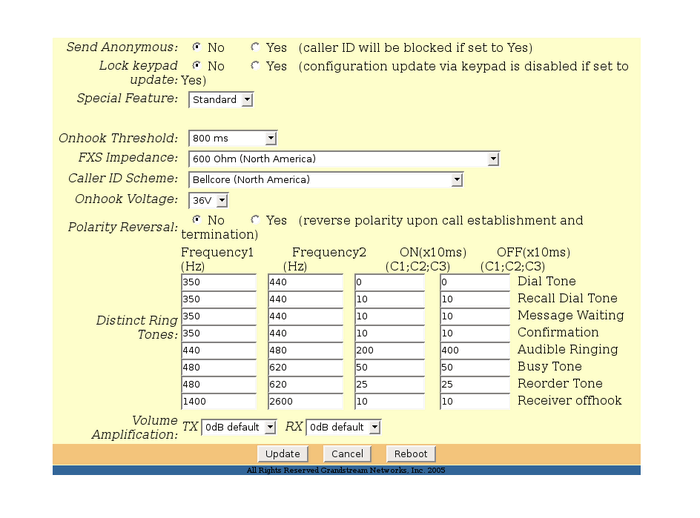
The fourth option is "FXS Port. The settings here are: SIP Server, Outbound Proxy, SIP User ID, Authenticate ID and password, UnRegister on Reboot, Registration Expiration, Preferred Vocoder, Fax Mode(T.38 or Pass-Through), Onhook Voltage, Distinct Ring Tones(Frequency 1(Hz), Frequency 2(Hz) and more. You can figure out by yourself what exactly you can set/change on this option.

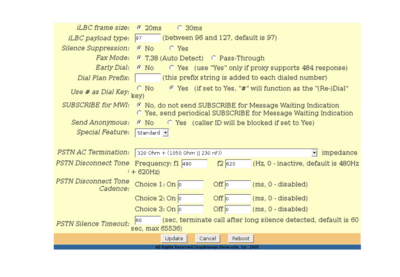
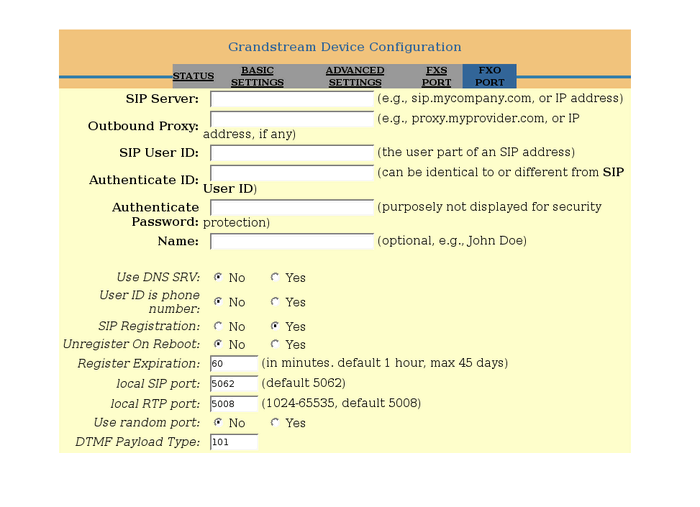
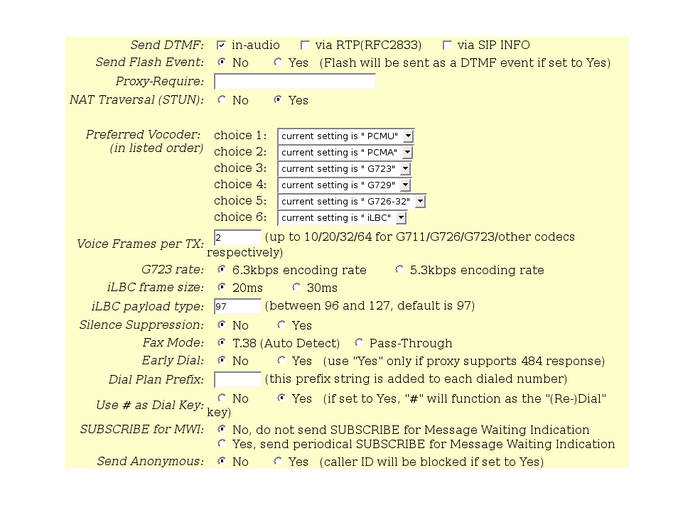
If you are not very familiar with HandyTone-488 then the fifth option - "FXO Port" will seem to you similar tothe previous one - "FXS Port. There are similar options, right, but remember that on the FXS port you must plug-in the Phone, on the FXO port - Phone Line.
From the WAN port:
7. Additional information
Official Grandstream HandyTone-488 page
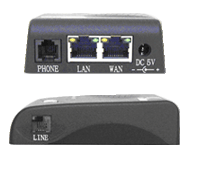
Grandstream HandyTone-488 is a multi-port, all-in-one Analog telephone adapter. It has one RJ11 FXS port(Telephone device), one RJ11 FXO port(Phone line), two RJ45 10Mbits Ethernet ports(LAN and WAN) and one power-supply jack. HandyTone-488 VoIP telephone supports lots of protocols including SIP 2.0, TCP/UDP/IP, RTP/RTCP, HTTP, ICMP, ARP/RARP, DNS, DHCP(both client and server), NTP, TFTP, PPPoE, STUN. It also supports different codecs: G.711, G.723.1, G.729A/B, G.728, G.726, iLBC.
2.Differences between HandyTone-488 and HandyTone-486
(HandyTone 486 ver 2 is called Handytone 487)
HandyTone-488 allows call origination and termination from/to PSTN network (via FXO port) remotely and automated emergency call routing via PSTN network
3. Product Features
* Supports SIP 2.0 (3RFC 3261), TCP/UDP/IP, RTP/RTCP, HTTP, ICMP, ARP/RARP, DNS, DHCP (both client and server), NTP, PPPoE, STUN, TFTP, etc.
* Includes a built in router, NAT, Gateway and DMZ port forwarding capable
* Supports call origination and termination from/to the PSTN network (via FXO port)
* Powerful digital signal processing (DSP) to ensure highest audio quality; advanced adaptive jitter control and packet loss concealment technology
* Supports various vocoders including G.711 (a-law and u-law), G.723.1 (5.3K/6.3K), G.726 (40K/32K/24K/16K), as well as G.728 and G.729A/B, and iLBC.
* Supports advanced call features on FXS port, including Caller ID/Name display or block, Hold, Call Waiting/Flash, Call Transfer, Call Forward, 3-way conference, in-band and out-of-band DTMF(Dual Tone Multi Frequency), Dial Plans, etc.
* Supports faxes passing through (for PCMU and PCMA) and T.38 FoIP (Fax over IP).
* Supports Silence Suppression, VAD (Voice Activity Detection), CNG (Comfort Noise Generation), Line Echo Cancellation (G.168), and AGC (Automatic Gain Control)
* Supports standard encryption and authentication (DIGEST using MD5 and MD5-sess)
* Supports Layer 2 protocols (802.1Q VLAN, 802.1p) and Layer 3 QoS (ToS, DiffServ and MPLS)
* Supports automated NAT traversal (not necessary to manually configure Firewall/NAT)
* Device configuration via Web browser, built-in IVR, or central configuration file through TFTP or HTTP
* Firmware upgrades via TFTP or HTTP with encrypted configuration files
* Supports PSTN calls passing through
* Ultra compact (wallet size) and lightweight design, great companion for travelers
* Compact, lightweight Universal Power adapter.
4. Prerequisites
The steps to install a HandyTone-488 are as follows:
1. Connect a standard touch-tone analog telephone to the PHONE port.
2. Insert a standard RJ11 telephone cable into the LINE port and connect the other end of the telephone cable to a wall jack.
3. Insert the Ethernet cable into the WAN port of HandyTone-488 and connect the other end of the Ethernet cable to an uplink port (a router or a modem, etc.)
4. Connect a PC to the LAN port of HandyTone-488 if it is used as a router.
5. Insert the power adapter into the HandyTone-488 and connect it to a wall outlet.
5. Asterisk PBX configuration
5.1 sip.conf
First, you need to register a user in the sip.conf file. In our case we are registering the user test, to use for line1 and user test2 for line2. You have to also set the password(secret) - in our case test for line1 and test2 for the second line.
Type=friend means that this user can make and receive calls. Secret=test and Secret=test2 - password test for line1 and test2 for line2. Host=dynamic means that the IP is not static but dynamic through a DHCP server. Allow=all means that the line which this user will use supports all audio codecs. Context=test - this shows that this user is working with the extensions in this context of the configuration file extensions.conf.
5.2 extensions.conf
The first line in the context [test] shows that if somebody dials the number 102 his call will be connected with the user test through SIP. In our case this user is set for line 1. The next line says that if the conversation is over then Asterisk has to hang up the line.
Do the same if you want to use line 2. In our example we do this with the number 104. If somebody dials 104, his call will be connected with the user test2 through SIP. Again, its good to add an extension for a hanging up in order to be sure that when the conversation is over the Asterisk PBX will hang up the line. You can see a screenshot of extensions.conf below.
6. Configuration
6.1 Configuration through phone
From the telephone connected to the HandyTone-488, you can only do the basic settings. For the advanced settings you have to access the HandyTone-488 through the web interface.
To access the build-in configuration menu you have to enter the asterisk (***) three times.
Grandstream HandyTone-488 Menu:
*** Enter menu option
Enter * for next, # for main menu or 01-06, 99 or any from the below listed numbers.
Dial Prompt Description
01 DHCP mode, Static IP mode
To change the mode - press 9.
02 IP address + IP address
It will announce the current WAN IP address. If you are in static IP mode you can change the address. To do this, just enter 12 digits for the new IP address.
03 Subnet + IP address
Same as menu option 02
04 Gateway + IP address
Same as menu option 02
05 DNS server + IP address
Same as the menu option 02
06 TFTP server + IP address
Same as menu option 02
47 Direct IP calling
You will be prompted to enter the 12-digit IP address that will be dialled.
86 Voice messages pending, No voice messages
Enter 9 to dial a preconfigured phone number to check your voicemail.
99 Reset
Enter 9 to confirm the reset, or enter the MAC address to restore factory settings.
But how to enter the IP addresses? Let say, we want to enter for static IP address 10.3.5.2. So we have to press: 010 003 005 002. Subnet 255.0.0.0 is equal to 255 000 000 000 , and so on
6.2 Access the Web Configuration Menu
The HandyTone-488 HTML configuration page can be accessed via LAN or WAN port:
From the LAN port:
* Directly connect a computer to the LAN port.
* Open a command window on the computer
* Type in ipconfig /release, the IP address becomes 0.
* Type in ipconfig /renew, the computer gets an IP address in 192.168.2.x segment by default
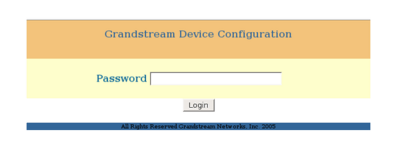
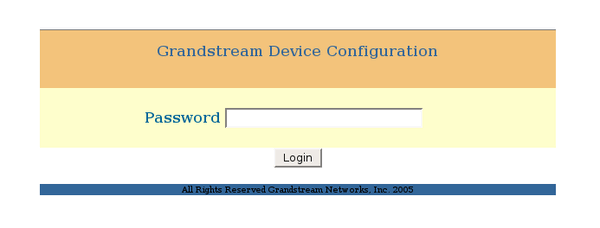
* Open a web browser, type in the default gateway IP address. You will see the log in page of the device.
http://192.168.2.1
There are admin and user accounts. The admin account is for changing the advanced settings, the user account is used for changing only the basic settings.
username: admin
password: admin
username: user
password: 123
password: admin
username: user
password: 123
The first option is "STATUS". On this screen you can see statistics for the outgoing and incoming calls, what is the WAN IP Address for the device, etc.:
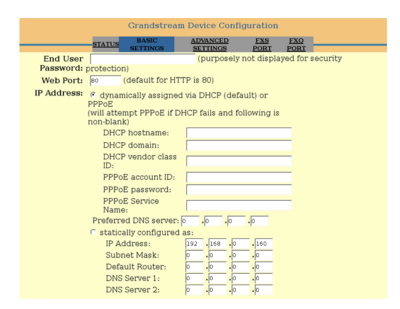
The second option is "Basic Settings". Here you can change the Web port, WAN port, timezone, NAT/DHCP settings, port forwarding, etc.:
On the first screenshot of "Basic Settings(look below), you can change the End user password(account: user), Web port, IP Address, DNS server settings:
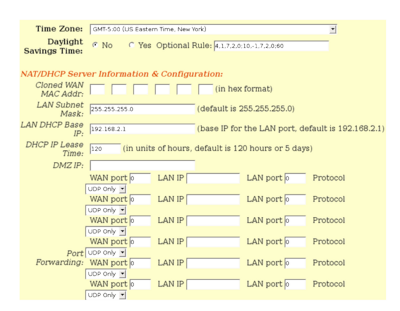
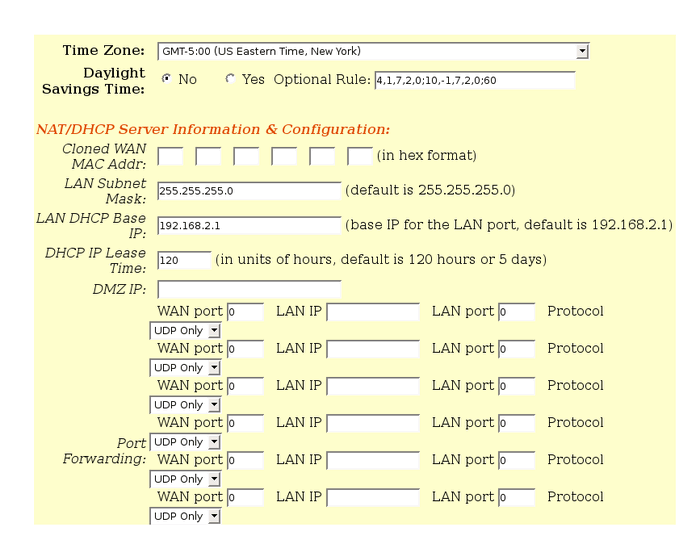
On the second screenshot of "Basic Settings"(look below), you can change the time zone, NAT/DHCP server settings like Cloned WAN MAC Address, Subnet Mask, making port forwarding:
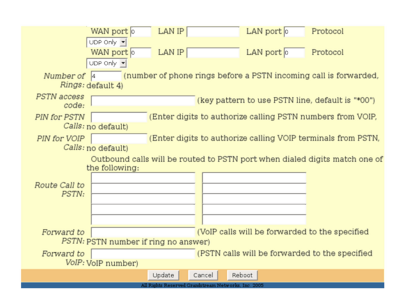
On the third screenshot of "Basic Settings"(look below), you can change the PIN for PSTN/VoIP calls, to forward to PSTN/VoIP, etc.:

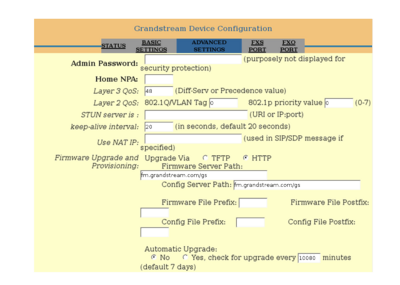
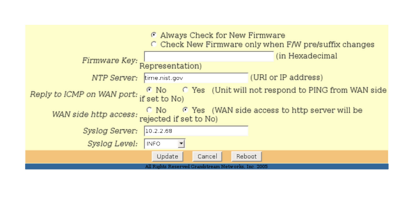
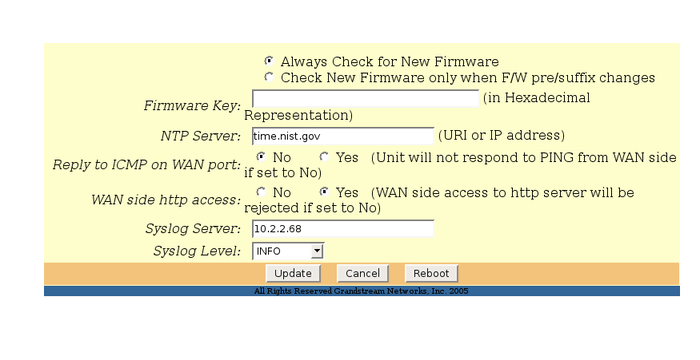
The third option is "Advanced Settings". Here you can change all advanced settings for HandyTone-488: Admin password, STUN Server, Firmware server path, Firmware way to upgrade, Firmware key, NTP Server hostname or IP Address, Syslog Server and Level for logging. Also here you can enable the access via WAN, which is disabled by default. The option is: "WAN side http access - No or Yes".
On the first screenshot of "Advanced Settings"(look below), you can change the Admin password, STUN Server, set the way to Firmware upgrade - HTTP or TFTP, set the Firmware Server Path and etc.:
The second screenshot of "Advanced Settings" is for changing the NTP Server, to enable WAN side http access, to set Syslog Server and Syslog Level logging:
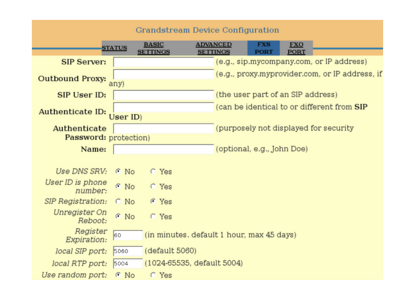
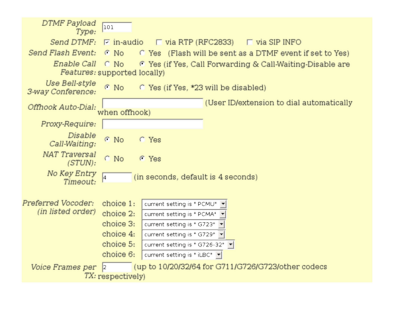
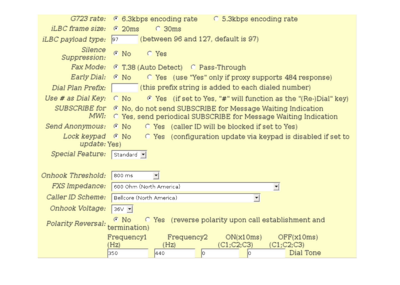
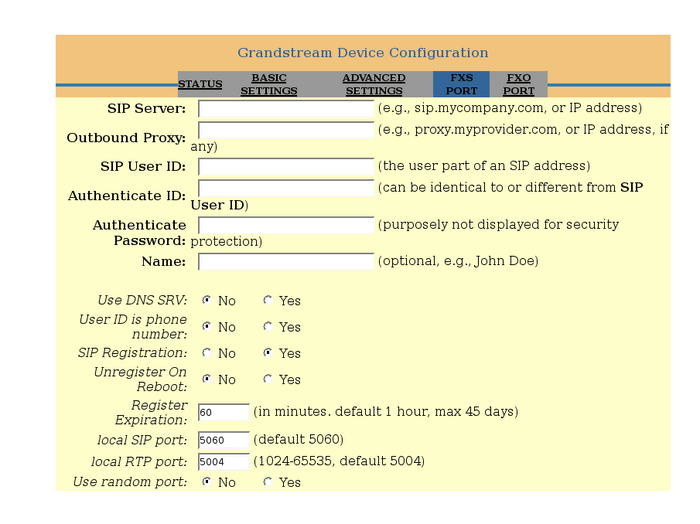
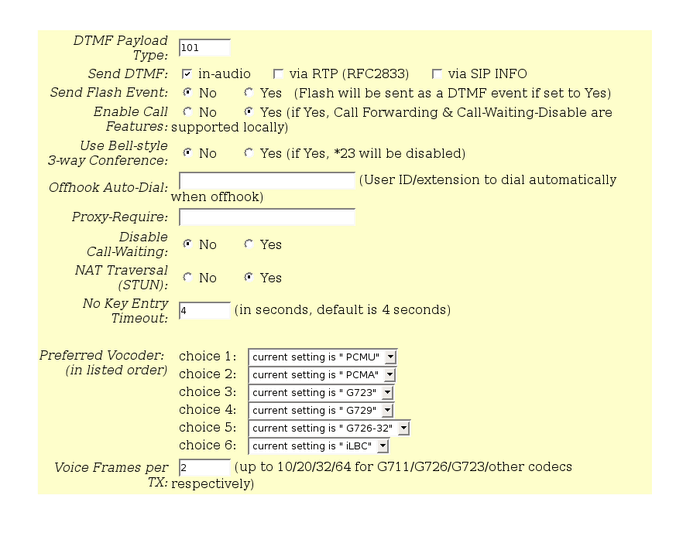
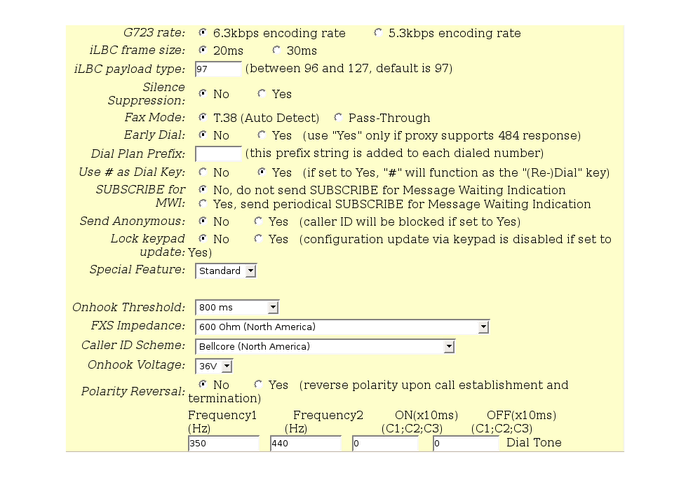
The fourth option is "FXS Port. The settings here are: SIP Server, Outbound Proxy, SIP User ID, Authenticate ID and password, UnRegister on Reboot, Registration Expiration, Preferred Vocoder, Fax Mode(T.38 or Pass-Through), Onhook Voltage, Distinct Ring Tones(Frequency 1(Hz), Frequency 2(Hz) and more. You can figure out by yourself what exactly you can set/change on this option.
If you are not very familiar with HandyTone-488 then the fifth option - "FXO Port" will seem to you similar tothe previous one - "FXS Port. There are similar options, right, but remember that on the FXS port you must plug-in the Phone, on the FXO port - Phone Line.
Let's see some "FXO Port" screenshots:

From the WAN port:
Note:
WAN side HTTP access is disabled by default for security reason. You can enable it on the configuration page by setting WAN side HTTP access to be YES. The very first time to access the configuration page is always from LAN port. The instructions are listed above.
The IVR announces a 12 digits IP address, you need to strip out the leading 0in the IP address.
For example IP address: 192.168.001.014, you need to type in http://192.168.1.14 in the web browser.
* Follow section 6.1 to find out the WAN side IP address.
* Open a web browser, type in the WAN side IP address.
7. Additional information
Restore Factory Default Setting
Please disconnect network cable and power cycle the unit before trying to reset the unit to factory defaults.
The steps are as follows:
Step 1: Find the MAC Address of the device. It is a 12 digits HEX number located on the bottom side of the unit.
Step 2: Encode the MAC address. Please use the following mapping:
0-9: 0-9
A: 22
B: 222
C: 2222
D: 33
E: 333
F: 3333
For example, if the MAC address is 004063d4ca1a, it should be encoded as 004063334222222122.
Step 3: To perform factory reset:
1. Press *** or the LED button for voice prompt.
2. Enter 99 and get the voice prompt Reset.
3. Enter the encoded MAC address of the device.
4. Wait for 15 seconds.
The device will reboot automatically and restore to factory default settings.
Note:
Please note that by default the HandyTone-488 WAN side HTTP access is disabled. After a
factory reset, the devices web configuration page can be accessed only from its LAN port, please refer to instructions in section 5.2 for details.
factory reset, the devices web configuration page can be accessed only from its LAN port, please refer to instructions in section 5.2 for details.
Official Grandstream HandyTone-488 page
| Add Comment |
Latest Headlines:
-
T.38 faxing with Zoiper 2.15 is now easier than ever
section: voip software
-
Asterisk 1.4.21 Released
section: Asterisk
-
Asterisk 1.4.20 Released
section: Asterisk
-
Asterisk 1.4.20-rc2 Released
section: Asterisk
-
Asterisk 1.4.20-rc1 Now Available
section: Asterisk
- News Archives (older news)
Latest Tutorials:
-
Sending Fax from Zoiper to Zoiper using T.38
added 08/Dec/2008 18:16
-
VMAuthenticate (dialplan application)
added 01/Mar/2008 15:57
-
Siptronic ST-530
added 06/Nov/2007 17:57
-
Siemens C455 IP hardphone
added 05/Nov/2007 10:24
-
Zoiper
added 22/Oct/2007 17:53
Latest Comments:
-
Casino Online Games, [url=https://edaho...
tutorial: DrayTek Vigor 2900V - broadband security voip router
-
https://scream-7-taiwansub.readme.io/ref...
tutorial: Read (dialplan application)
-
Official Facebook@:-
https://www.facebo...
tutorial: SIP with NAT or Firewalls
-
https://ia800702.us.archive.org/22/items...
tutorial: Request to schedule in the past?!?!
-
https://www.imipe.org.mx/sites/default/f...
tutorial: RemoveQueueMember (dialplan application)