

4.2.5. Asterisk and AVM C4 BRI card - HowTo
Introduction
In this tutorial we are going to show you how to set up your Asterisk server to work with AVM C4 PCI ISDN-Controller card on Debian GNU/Linux, under the CAPI channel
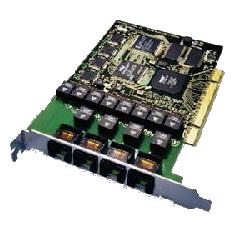
The AVM C4 PCI card is an ISDN controller for ISDN Basic Rate Interface (BRI), which support the Novell CAPI Manager interface. It supports all of the features provided by the BRI.
The AVM ISDN-Controller C4 is the right hardware for server installations with more than one basic-rate ISDN line. Equipped with a StrongARM SA-110 processor for 270 MIPS and 16 MB of on-board memory, the C4 supports all the ISDN communication services. Its design affords exclusive digital and analog communication features.
Product Overview
Technical specifications
Application interface Common ISDN API 2.0
Analog protocols:
Preparations
We already mentioned that we will use a Debian Linux distribution. For different Linux distribution the commands may differ.
We assume that you already have an installed and running Asterisk.
However, if you do not have it or do not know how to do it, we have a tutorial which will guide through the whole process of how to obtain, compile and start a working Asterisk PBX. You could start from the basic - here and then you could continue with the configuration files, applications and functions.
Now, let's continue with the AVM C4 card. The best thing about it is that the drivers are coming with the Linux kernel (2.6.15.1 or higher). However, It will not hurt if you check, whether do you actually have them.
The file, you are looking for is called c4.ko.
Here is the result:

Ok, now we know that the drivers are here - it is time to get the CAPI channel installed and working. In order to install successfully the chan_capi module, we will need some extra packages.
Extra Packages
The packages that you need to install are: capiutils and libcapi20-dev. They are available in the current Debian Stable version, which now is 3.1. In some Debian testing versions it is missing. If this is your case you will need to make a small change into your source.list (this is the file where you specify the sources, where your apt program to search for packages).
The change is to add one line into this file. It is placed in the /etc/apt/ directory. The line you have to add, in our case is:
deb http://ftp.belnet.be/debian/ stable main contrib non-free. However in your case could be different - you could change http://ftp.belnet.be/ with the closest Debian mirror site to your location.
The whole operation:
Now you are ready to obtain the packages - just perform the following command:
We need this package because its purpose is to load the cards drivers (remember the c4.ko) and the card firmware.
As we mention firmware - the card firmware is required. You have to download it. It is available at the following web address: ftp://ftp.in-berlin.de/pub/capi4linux/firmware/c4/
Get the latest version of the c4.bin file and put it in the /usr/share/isdn directory (you might need to create that one first).
In order to perform that job, you could use the following commands:
At that point the drivers of your AVM card should be started automatically.
If they are not, you will have to take a look at the capi.conf file, placed in the /etc/isdn/ directory. It should look like this:
What you are looking for, is something like the following on the picture below:

chan_capi Module
Now, we are ready for the chan_capi module. The latest chan_capi source could be obtained from: ftp://ftp.chan-capi.org/chan-capi. Currently chan_capi-1.0.0 is the final version of chan_capi. Download it and put the package in your /usr/src directory. Unpack it by using the following command:
Now the installation - in order to install the chan_capi module use the following commands:
Congratulations, you have the chan_capi module installed.
Configurating Asterisk
We already have working BRI card and installed chan_capi module. The next step is to make it work with our Asterisk PBX.
First, check in the modules.conf file, placed in the /etc/asterisk/ directory, whether do you have the following lines:
If they do not exist, you have to add them manually
The second configuration file, where you have to make configurations capi.conf file, placed in the /et/asterisk/ directory.
There is a sample configuration file in the chan_capi package, which you could copy into your /etc/asterisk directory.
However, if you execute the make install_config as shown above then the system will do this automatically.
The sample capi.conf configuration file looks like the following:
This configuration of the file is made for a BRI line in point-to-multipoint TE mode. If you are now familiar with this terms please read the following tutorial
The third file to configure depends on the protocol you are going to use - IAX2, SIP, MGCP. In our case we will use our softphone Idefisk, which use the IAX2 protocol. You could download it from here. Please, take a look also at our tutorial - to learn how to configure it to work with Asterisk PBX.
Testing
We need one registered user in the iax.conf file (we are going to use the IAX2 protocol). If you want to use other protocol such as SIP or MGCP, you have to do the configurations below respectively in the sip.conf or mgcp.conf.
So, we have registered the user Idefisk
Type=friend means that this user is allowed to make and receive calls. Host=dynamic means that the IP is not statically assigned but dynamically through DHCP server. Allow=all means that the line, which this user will use, could support all audio codecs. Context=test - this shows that the user will be allowed to work only with the extensions in this context in the configuration file extensions.conf.
Our capi.conf
extensions.conf Configurations
Now lets take a look at the extensions.conf file.
On the picture above you could see our test extensions.conf file. As you could see on the screenshot of our capi.conf - the context where the incoming calls will be handled is capi-in. So we will make a context with this name and we will configure the following extension:
So when somebody dial 555555 (this is our ISDN number) he/she will be directed to our test context and attached to the internal number 555. All this will be provided by the GoTo application.
The 555 number will be attached to the Idefisk user through the IAX2 protocol used with the Idefisk softphone. For the purpose we will use the Dial application with arguments - IAX2/idefisk.
Now the incoming calls are handled, but what about the outgoing?
Well, in order to make outgoing calls using the CAPI channel there are three different ways to do this. The syntaxes are:
In our case we will use the last one with the interface-name. As you could see in the screenshot above, our interface section has the name ISDN1. So we will use this name to dial out:
In this way our user will be able to make outgoing calls by dialing 9 in front of the number.
Finally, in order to be sure that the Asterisk PBX will hang up the line, when the conversation is over, it is a good idea to make an extension for hanging up the line using the Hangup application.
Links
Uploaded files
References
In this tutorial we are going to show you how to set up your Asterisk server to work with AVM C4 PCI ISDN-Controller card on Debian GNU/Linux, under the CAPI channel
The AVM C4 PCI card is an ISDN controller for ISDN Basic Rate Interface (BRI), which support the Novell CAPI Manager interface. It supports all of the features provided by the BRI.
The AVM ISDN-Controller C4 is the right hardware for server installations with more than one basic-rate ISDN line. Equipped with a StrongARM SA-110 processor for 270 MIPS and 16 MB of on-board memory, the C4 supports all the ISDN communication services. Its design affords exclusive digital and analog communication features.
Product Overview
Technical specifications
AVM ISDN-Controller for BRI lines; PCI bus interface
One to four BRI lines
Active ISDN-Controller with on-board CPU and memory
High-performance StrongARM SA-110 CPU with 270 MIPS at 233 MHz
16 MB of SDRAM
State-of-the-art technologies, including BGA devices, SDRAM, 3.3 V supply voltage, and more
Low power consumption: about 3 W
PCI bus-mastering DMA: minimum system load and maximum throughput
Application interface Common ISDN API 2.0
Digital protocols: X.75, HDLC transparent, bit-transparent, X.25, ISO 8208 (X.25 DTE-DTE), X.31 Case a/b, T.70, T.90, Mobile ISDN (ISO 3309), V.110, V.120
CAPI SoftCompression X.75/V.42bis and channel bundling in conformance with CAPI specification
CAPI SoftFax: fax at 2400, 4800, 9600 and 14400 bit/s, including ECM and MR/MMR; CAPI SoftModem: analog modem connections at 1200/75, 2400, 4800, 9600 and 14,400 bit/s
CAPI SoftCompression X.75/V.42bis and channel bundling in conformance with CAPI specification
CAPI SoftFax: fax at 2400, 4800, 9600 and 14400 bit/s, including ECM and MR/MMR; CAPI SoftModem: analog modem connections at 1200/75, 2400, 4800, 9600 and 14,400 bit/s
Analog protocols:
Group 3 fax (T.30, V.17, V.29, V.27ter), Group 3 Annex A (Error Correction Mode) and two-dimensional data compression (MR/MMR)
Modem connections with V.2, V.21, V.22bis, V.22, and V.32bis
DTMF detection, support for point-to-point lines and leased lines
Supplementary Services (such as Hold & Retrieve, Suspend & Resume (TP), 3PTY, ECT, and more)
All protocol software downloaded to the controller
AVM CoNDIS WAN, AVM TAPI, and AVM ISDN CAPI Port Driver for all supported Windows operating systems
Up to four ISDN-Controller C4s in one system
International approvals
Preparations
We already mentioned that we will use a Debian Linux distribution. For different Linux distribution the commands may differ.
We assume that you already have an installed and running Asterisk.
However, if you do not have it or do not know how to do it, we have a tutorial which will guide through the whole process of how to obtain, compile and start a working Asterisk PBX. You could start from the basic - here and then you could continue with the configuration files, applications and functions.
Now, let's continue with the AVM C4 card. The best thing about it is that the drivers are coming with the Linux kernel (2.6.15.1 or higher). However, It will not hurt if you check, whether do you actually have them.
$ cd /lib/modules/`uname -r`/kernel/drivers/
$ ls -la
$ cd isdn/hardware/avm/
$ ls
$ ls -la
$ cd isdn/hardware/avm/
$ ls
The file, you are looking for is called c4.ko.
Here is the result:

Ok, now we know that the drivers are here - it is time to get the CAPI channel installed and working. In order to install successfully the chan_capi module, we will need some extra packages.
Extra Packages
The packages that you need to install are: capiutils and libcapi20-dev. They are available in the current Debian Stable version, which now is 3.1. In some Debian testing versions it is missing. If this is your case you will need to make a small change into your source.list (this is the file where you specify the sources, where your apt program to search for packages).
The change is to add one line into this file. It is placed in the /etc/apt/ directory. The line you have to add, in our case is:
deb http://ftp.belnet.be/debian/ stable main contrib non-free. However in your case could be different - you could change http://ftp.belnet.be/ with the closest Debian mirror site to your location.
The whole operation:
$ cd /etc/apt/
$ vim source.list
Add - deb http://ftp.belnet.be/debian/ stable main contrib non-free
$ vim source.list
Add - deb http://ftp.belnet.be/debian/ stable main contrib non-free
Now you are ready to obtain the packages - just perform the following command:
$ apt-get install capiutils
$ apt-get install libcapi20-dev
$ apt-get install libcapi20-dev
We need this package because its purpose is to load the cards drivers (remember the c4.ko) and the card firmware.
As we mention firmware - the card firmware is required. You have to download it. It is available at the following web address: ftp://ftp.in-berlin.de/pub/capi4linux/firmware/c4/
Get the latest version of the c4.bin file and put it in the /usr/share/isdn directory (you might need to create that one first).
In order to perform that job, you could use the following commands:
$ mkdir -p /usr/share/isdn
$ cd /usr/share/isdn
$ wget ftp://ftp.in-berlin.de/pub/capi4linux/firmware/c4/3-09-07/c4.bin
$ cd /usr/share/isdn
$ wget ftp://ftp.in-berlin.de/pub/capi4linux/firmware/c4/3-09-07/c4.bin
At that point the drivers of your AVM card should be started automatically.
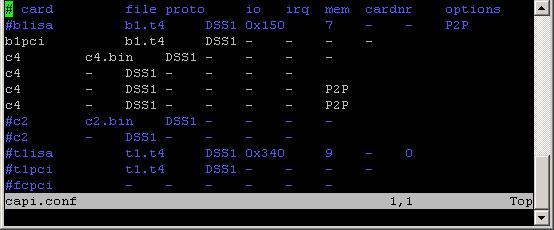
If they are not, you will have to take a look at the capi.conf file, placed in the /etc/isdn/ directory. It should look like this:
$ cd /etc/isdn/
$ vim capi.conf
$ vim capi.conf
What you are looking for, is something like the following on the picture below:
chan_capi Module
Now, we are ready for the chan_capi module. The latest chan_capi source could be obtained from: ftp://ftp.chan-capi.org/chan-capi. Currently chan_capi-1.0.0 is the final version of chan_capi. Download it and put the package in your /usr/src directory. Unpack it by using the following command:
$ tar -xvzf chan_capi-1.0.0.tar.gz
Now the installation - in order to install the chan_capi module use the following commands:
$ cd /usr/src/chan_capi-1.0.0
$ make
$ make install
$ make install_config
$ make
$ make install
$ make install_config
Congratulations, you have the chan_capi module installed.
Configurating Asterisk
We already have working BRI card and installed chan_capi module. The next step is to make it work with our Asterisk PBX.
First, check in the modules.conf file, placed in the /etc/asterisk/ directory, whether do you have the following lines:
load => chan_capi.so
and in the [global] section:
chan_capi.so=yes
and in the [global] section:
chan_capi.so=yes
If they do not exist, you have to add them manually
The second configuration file, where you have to make configurations capi.conf file, placed in the /et/asterisk/ directory.
# cd /etc/asterisk/
# vim capi.conf
# vim capi.conf
There is a sample configuration file in the chan_capi package, which you could copy into your /etc/asterisk directory.
However, if you execute the make install_config as shown above then the system will do this automatically.
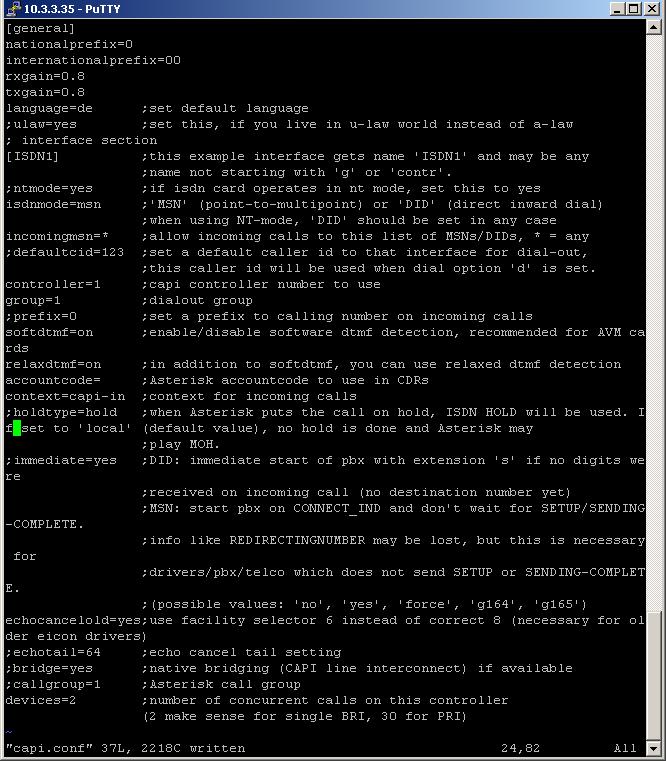
The sample capi.conf configuration file looks like the following:
;
; CAPI config
;
;

; general section

[general]
nationalprefix=0
internationalprefix=00
rxgain=0.8
txgain=0.8
language=de            ;set default language
;ulaw=yes                 ;set this, if you live in u-law world instead of a-law

; interface sections ...

[ISDN1]                   ;this example interface gets name 'ISDN1' and may be any
                              ;name not starting with 'g' or 'contr'.
;ntmode=yes           ;if isdn card operates in nt mode, set this to yes
isdnmode=msn        ;'MSN' (point-to-multipoint) or 'DID' (direct inward dial)
                              ;when using NT-mode, 'DID' should be set in any case
incomingmsn=*        ;allow incoming calls to this list of MSNs/DIDs, * = any
;defaultcid=123        ;set a default caller id to that interface for dial-out,
                              ;this caller id will be used when dial option 'd' is set.
;controller=0            ;ISDN4BSD default
;controller=7            ;ISDN4BSD USB default
controller=1             ;capi controller number to use
group=1                  ;dialout group
;prefix=0                 ;set a prefix to calling number on incoming calls
softdtmf=on            ;enable/disable software dtmf detection, recommended for AVM cards
relaxdtmf=on          ;in addition to softdtmf, you can use relaxed dtmf detection
accountcode=          ;Asterisk accountcode to use in CDRs
context=capi-in        ;context for incoming calls
;holdtype=hold        ;when Asterisk puts the call on hold, ISDN HOLD will be used. If
                             ;set to 'local' (default value), no hold is done and Asterisk may
                             ;play MOH.
;immediate=yes      ;DID: immediate start of pbx with extension 's' if no digits were
                             ;     received on incoming call (no destination number yet)
                             ;MSN: start pbx on CONNECT_IND and don't wait for SETUP/SENDING-COMPLETE.
                             ;     info like REDIRECTINGNUMBER may be lost, but this is necessary for
                             ;     drivers/pbx/telco which does not send SETUP or SENDING-COMPLETE.
;echosquelch=1       ;_VERY_PRIMITIVE_ echo suppression
;echocancel=yes      ;EICON DIVA SERVER (CAPI) echo cancelation
                             ;(possible values: 'no', 'yes', 'force', 'g164', 'g165')
echocancelold=yes   ;use facility selector 6 instead of correct 8 (necessary for older eicon drivers)
;echotail=64            ;echo cancel tail setting
;bridge=yes            ;native bridging (CAPI line interconnect) if available
;callgroup=1           ;Asterisk call group
;language=de         ;set language for this device (overwrites default language)
devices=2              ;number of concurrent calls on this controller
                            ;(2 makes sense for single BRI, 30 for PRI)
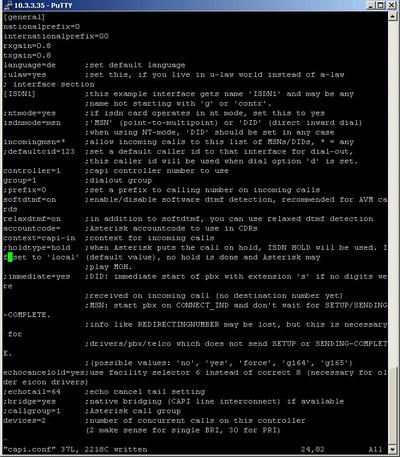
This configuration of the file is made for a BRI line in point-to-multipoint TE mode. If you are now familiar with this terms please read the following tutorial
The third file to configure depends on the protocol you are going to use - IAX2, SIP, MGCP. In our case we will use our softphone Idefisk, which use the IAX2 protocol. You could download it from here. Please, take a look also at our tutorial - to learn how to configure it to work with Asterisk PBX.
Testing
We need one registered user in the iax.conf file (we are going to use the IAX2 protocol). If you want to use other protocol such as SIP or MGCP, you have to do the configurations below respectively in the sip.conf or mgcp.conf.
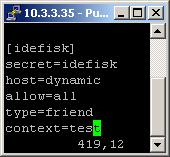
So, we have registered the user Idefisk
Type=friend means that this user is allowed to make and receive calls. Host=dynamic means that the IP is not statically assigned but dynamically through DHCP server. Allow=all means that the line, which this user will use, could support all audio codecs. Context=test - this shows that the user will be allowed to work only with the extensions in this context in the configuration file extensions.conf.
Our capi.conf
extensions.conf Configurations
Now lets take a look at the extensions.conf file.

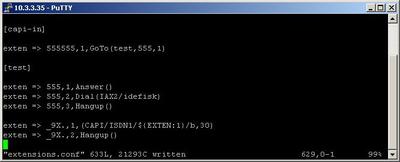
On the picture above you could see our test extensions.conf file. As you could see on the screenshot of our capi.conf - the context where the incoming calls will be handled is capi-in. So we will make a context with this name and we will configure the following extension:
exten => 555555,1,GoTo(test,555,1)
So when somebody dial 555555 (this is our ISDN number) he/she will be directed to our test context and attached to the internal number 555. All this will be provided by the GoTo application.
The 555 number will be attached to the Idefisk user through the IAX2 protocol used with the Idefisk softphone. For the purpose we will use the Dial application with arguments - IAX2/idefisk.
Now the incoming calls are handled, but what about the outgoing?
Well, in order to make outgoing calls using the CAPI channel there are three different ways to do this. The syntaxes are:
Dial(CAPI/g<group>/[<callerid>:]<destination>[/<params>])
Dial(CAPI/contr<controller>/[<callerid>:]<destination>[/<params>])
Dial(CAPI/<interface-name>/[<callerid>:]<destination>[/<params>])
Dial(CAPI/contr<controller>/[<callerid>:]<destination>[/<params>])
Dial(CAPI/<interface-name>/[<callerid>:]<destination>[/<params>])
In our case we will use the last one with the interface-name. As you could see in the screenshot above, our interface section has the name ISDN1. So we will use this name to dial out:
exten => _9X.,1,Dial(CAPI/ISDN1/${EXTEN:1}/b,30)
In this way our user will be able to make outgoing calls by dialing 9 in front of the number.
Finally, in order to be sure that the Asterisk PBX will hang up the line, when the conversation is over, it is a good idea to make an extension for hanging up the line using the Hangup application.
Links
Uploaded files
iax.conf
extensions.conf
capi.conf
chan_capi-1.0.0.tar.gz
c4.bin
INSTALL - chan_capi.txt
README - chan_capi.txt
extensions.conf
capi.conf
chan_capi-1.0.0.tar.gz
c4.bin
INSTALL - chan_capi.txt
README - chan_capi.txt
References
| Add Comment |
Latest Headlines:
-
T.38 faxing with Zoiper 2.15 is now easier than ever
section: voip software
-
Asterisk 1.4.21 Released
section: Asterisk
-
Asterisk 1.4.20 Released
section: Asterisk
-
Asterisk 1.4.20-rc2 Released
section: Asterisk
-
Asterisk 1.4.20-rc1 Now Available
section: Asterisk
- News Archives (older news)
Latest Tutorials:
-
Sending Fax from Zoiper to Zoiper using T.38
added 08/Dec/2008 18:16
-
VMAuthenticate (dialplan application)
added 01/Mar/2008 15:57
-
Siptronic ST-530
added 06/Nov/2007 17:57
-
Siemens C455 IP hardphone
added 05/Nov/2007 10:24
-
Zoiper
added 22/Oct/2007 17:53
Latest Comments:
-
Casino Online Games, [url=https://edaho...
tutorial: DrayTek Vigor 2900V - broadband security voip router
-
https://scream-7-taiwansub.readme.io/ref...
tutorial: Read (dialplan application)
-
Official Facebook@:-
https://www.facebo...
tutorial: SIP with NAT or Firewalls
-
https://ia800702.us.archive.org/22/items...
tutorial: Request to schedule in the past?!?!
-
https://www.imipe.org.mx/sites/default/f...
tutorial: RemoveQueueMember (dialplan application)