

1.7. Installation on Slackware
In this tutorial we are going to explain you how to compile Asterisk on Slackware from source code.
There are existing Slackware packages, but they are not officially supported in the distribution. They could be downloaded from here (Asterisk version 1.2.1)
We are using test machine with installed Slackware 10.0 on it.
1) Requirements
2) Getting Asterisk
3) Compiling Asterisk
4) Idefisk
5) References
We are using test machine with installed Slackware 10.0 on it.
1) Requirements
All the packages you need could be found on the Slackware install disks.
To manage the packages use the native Slackware tools pkgtool and installpkg.
Standard compilation tools:
Required packages for the Asterisk compilation:
If you need some extra packages they could be obtained from The Slackware website -> section Packages, or you could search them by name - here.
To manage the packages use the native Slackware tools pkgtool and installpkg.
Standard compilation tools:
* gcc
* make
* diffutils
* binutils
* make
* diffutils
* binutils
Required packages for the Asterisk compilation:
* Linux kernel header files.
* bison
* ncurses
* zlib
* openssl
* subversion (optional: if you want the latest source code) - this is missing on Slackware 10.1 and the older versions.
* bison
* ncurses
* zlib
* openssl
* subversion (optional: if you want the latest source code) - this is missing on Slackware 10.1 and the older versions.
If you need some extra packages they could be obtained from The Slackware website -> section Packages, or you could search them by name - here.
1.1) Subversion setup.
If you do not have an installed Subversion, download the Slackware package from here.
Subversion-1.2.3 requires glibc >= 2.3.3.
If your Slackware is version 10.1 or greater this dependency is satisfied. If not, you can use glibc-2.3.4-i486-1 or glibc-2.3.6-i486-1
In order to install a Subversion and/or glibc use installpkg:
# installpkg subversion-1.2.3-i486-1.tgz
# installpkg glibc-2.3.4-i486-1.tgz or glibc-2.3.6-i486-1.tgz
# installpkg glibc-2.3.4-i486-1.tgz or glibc-2.3.6-i486-1.tgz
2) Getting Asterisk
Download tarballs
The sources codes could be obtained also from the SVN repository. Follow the steps below:
At the time of this writing the official releases are:
Asterisk 1.2.4
Zaptel 1.2.3
LibPRI 1.2.2
For more downloads click here.
Asterisk 1.2.4
Zaptel 1.2.3
LibPRI 1.2.2
For more downloads click here.
The sources codes could be obtained also from the SVN repository. Follow the steps below:
# mkdir /usr/src/asterisk
# cd /usr/src/asterisk
For the latest SVN Head version:
# svn checkout http://svn.digium.com/svn/libpri/trunk libpri
# svn checkout http://svn.digium.com/svn/zaptel/trunk zaptel
# svn checkout http://svn.digium.com/svn/asterisk/trunk asterisk
For the latest stable version 1.2:
# svn checkout http://svn.digium.com/svn/libpri/branches/1.2 libpri-1.2
# svn checkout http://svn.digium.com/svn/zaptel/branches/1.2 zaptel-1.2
# svn checkout http://svn.digium.com/svn/asterisk/branches/1.2 asterisk-1.2
3) Compiling Asterisk
Please, follow the commands and read carefully the hints. Also it is a good idea to take a look at all the READMEs in each package directory.
If you choose to download the tarballs, then create the following directory: /usr/src/asterisk
and put the tarballs inside. Then decompress the archives by using the following commands:
IMPORTANT: Follow this installation order: 1.Libpri, 2.Zaptel and 3.Asterisk.
First compile the libpri:
Continue with the zaptel package:
Finally compile the Asterisk
If you want to optimize the compilation of Asterisk, take a look at the top of the Makefile.
Go to the asterisk source directory - # cd /usr/src/asterisk/asterisk-1.2.4
If you are using VIA motherboards, Asterisk may detect your processor as i686 instead of i586. In this case you must to edit the Makefile. Remove the comment (#) from the following PROC line:
Now execute the following commands:
If this is your first installation you have to execute the 'make samples' command in order to install the sample configuration files.
There is a startup script for Slackware. You could copy it into /etc/rc.d :
If you choose to download the tarballs, then create the following directory: /usr/src/asterisk
# mkdir /usr/src/asterisk
and put the tarballs inside. Then decompress the archives by using the following commands:
# tar zxvf package_name-version.tar.gz
IMPORTANT: Follow this installation order: 1.Libpri, 2.Zaptel and 3.Asterisk.
First compile the libpri:
# cd /usr/src/asterisk/libpri-1.2.2
# make clean
# make
# make install
# make clean
# make
# make install
Continue with the zaptel package:
# cd /usr/src/asterisk/zaptel-1.2.3
# make clean
# make linux26 (optional) - if you are using kernel 2.6
# make
# make install
# make clean
# make linux26 (optional) - if you are using kernel 2.6
# make
# make install
Finally compile the Asterisk
If you want to optimize the compilation of Asterisk, take a look at the top of the Makefile.
Go to the asterisk source directory - # cd /usr/src/asterisk/asterisk-1.2.4
If you are using VIA motherboards, Asterisk may detect your processor as i686 instead of i586. In this case you must to edit the Makefile. Remove the comment (#) from the following PROC line:
# Pentium & VIA processors optimize
# PROC=i586
# PROC=i586
Now execute the following commands:
# make clean
# make mpg123 (Note: Install only the mpg123 packages which are coming with the Asterisk package! (ver. 0.59r))
# make
# make install
# make mpg123 (Note: Install only the mpg123 packages which are coming with the Asterisk package! (ver. 0.59r))
# make
# make install
If this is your first installation you have to execute the 'make samples' command in order to install the sample configuration files.
There is a startup script for Slackware. You could copy it into /etc/rc.d :
# cp /usr/src/asterisk/contrib/init.d/rc.slackware.asterisk /etc/rc.d/rc.asterisk
4) Idefisk
Idefisk is a graphic application. So you need a working X server with some window manager installed. For example Gnome or KDE.
Idefisk depends on the GTK (GTK 2.6 or later) and expat libraries. So you have to install them. Use installpkg:
For example, if you mount the 1-st Slackware install disk on /mnt/cdrom, the expat library is in the /mnt/cdrom/slackware/l/ directory.
So you could install it with this command:
4.1) Download and Install
4.2) Possible errors and solutions
Idefisk depends on the GTK (GTK 2.6 or later) and expat libraries. So you have to install them. Use installpkg:
# installpkg /path/to/package/pkg-name.tgz
For example, if you mount the 1-st Slackware install disk on /mnt/cdrom, the expat library is in the /mnt/cdrom/slackware/l/ directory.
So you could install it with this command:
# installpkg /mnt/cdrom/slackware/l/expat-1.95.7-i486-1.tgz
4.1) Download and Install
In order to get the preferable Idefisk version, please follow this link.
For the installation, use a directory, where you have the rights to write!.
Inside, create a subdirectory. For example we will use the home directory of a regular Linux user.
For the installation, use a directory, where you have the rights to write!.
Inside, create a subdirectory. For example we will use the home directory of a regular Linux user.
$ cd ~
$ mkdir idefisk - put the Idefisk archive inside
$ tar zxvf idefisk.tar.gz
$ sudo cp libiaxclient.so /usr/lib
or
$ su < type your root password >
# cp libiaxclient.so /usr/lib - you may copy libiaxclient.so in /usr/local/lib if you prefer
# ldconfig
# exit
$ ./idefisk
$ mkdir idefisk - put the Idefisk archive inside
$ tar zxvf idefisk.tar.gz
$ sudo cp libiaxclient.so /usr/lib
or
$ su < type your root password >
# cp libiaxclient.so /usr/lib - you may copy libiaxclient.so in /usr/local/lib if you prefer
# ldconfig
# exit
$ ./idefisk
4.2) Possible errors and solutions
4.2.1) If you get an error like:
Please check for the libexpat in the /usr/lib directory
You must see something like:
If you do not have the libexpat.so.<some version> file, try to install "again" the expat.
Next step: create a symlink named libexpat.so.1 which has to point to the libexpat.so.0.5.0 file (the version numbers may be different). To do this use:
# cd /usr/lib
# ln -s libexpat.so.0.5.0 libexpat.so.1
"libexpat.so.1: No such file or directory"
Please check for the libexpat in the /usr/lib directory
# cd /usr/lib
# ls -l libexpat*
# ls -l libexpat*
You must see something like:
-rw-r--r-- 1 root root 160636 2005-09-09 18:58 libexpat.a
-rw-r--r-- 1 root root 706 2005-09-09 18:58 libexpat.la
lrwxrwxrwx 1 root root 17 2006-01-13 12:26 libexpat.so -> libexpat.so.0.5.0
lrwxrwxrwx 1 root root 17 2006-01-13 12:26 libexpat.so.0 -> libexpat.so.0.5.0
-rwxr-xr-x 1 root root 127428 2005-09-09 18:58 libexpat.so.0.5.0
-rw-r--r-- 1 root root 706 2005-09-09 18:58 libexpat.la
lrwxrwxrwx 1 root root 17 2006-01-13 12:26 libexpat.so -> libexpat.so.0.5.0
lrwxrwxrwx 1 root root 17 2006-01-13 12:26 libexpat.so.0 -> libexpat.so.0.5.0
-rwxr-xr-x 1 root root 127428 2005-09-09 18:58 libexpat.so.0.5.0
If you do not have the libexpat.so.<some version> file, try to install "again" the expat.
Next step: create a symlink named libexpat.so.1 which has to point to the libexpat.so.0.5.0 file (the version numbers may be different). To do this use:
# cd /usr/lib
# ln -s libexpat.so.0.5.0 libexpat.so.1
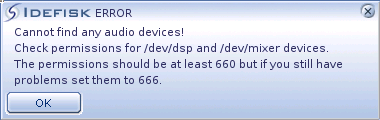
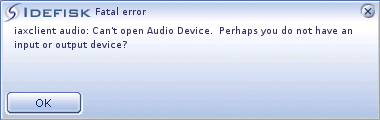
4.2.2) Audio devices errors
or
or
Check permissions. Use:
To set thepermissions of your sound devices use:
For the mixer device replace /dev/dsp with /dev/mixer
ls -l <device name>, /dev/dsp
or
/dev/mixer
or
/dev/mixer
To set thepermissions of your sound devices use:
# chmod 660 /dev/dsp
or
# chmod 666 /dev/dsp
or
# chmod 666 /dev/dsp
For the mixer device replace /dev/dsp with /dev/mixer
5) References
The Linux version of Idefisk
Tutorial about the Idefisk Softphone
The official Asterisk page
Slackware website
Asterisk installation from scratch (by the astGUIclient group)
Tutorial about the Idefisk Softphone
The official Asterisk page
Slackware website
Asterisk installation from scratch (by the astGUIclient group)
| Add Comment |
Latest Headlines:
-
T.38 faxing with Zoiper 2.15 is now easier than ever
section: voip software
-
Asterisk 1.4.21 Released
section: Asterisk
-
Asterisk 1.4.20 Released
section: Asterisk
-
Asterisk 1.4.20-rc2 Released
section: Asterisk
-
Asterisk 1.4.20-rc1 Now Available
section: Asterisk
- News Archives (older news)
Latest Tutorials:
-
Sending Fax from Zoiper to Zoiper using T.38
added 08/Dec/2008 18:16
-
VMAuthenticate (dialplan application)
added 01/Mar/2008 15:57
-
Siptronic ST-530
added 06/Nov/2007 17:57
-
Siemens C455 IP hardphone
added 05/Nov/2007 10:24
-
Zoiper
added 22/Oct/2007 17:53
Latest Comments:
-
https://run72.raiselysite.com/busrut-can...
tutorial: Installation on SuSE
-
Within the world of gambling, 1xBet Bet...
tutorial: DrayTek Vigor 2900V - broadband security voip router
-
https://www.instagram.com/p/DVVSIGaE0R0/...
tutorial: Asterisk Installation
-
https://gist.github.com/nadiiamadeleine/...
tutorial: SIP with NAT or Firewalls
-
https://gist.github.com/yappingg/2cd862f...
tutorial: Read (dialplan application)