1.9. Installation of Asterisk GUI
Installing Asterisk Graphical User Interface - AsteriskNow
This tutorial is meant to guide you during the installation of "Asterisk GUI".The Digium's Asterisk GUI is available only for version 1.4 of Asterisk. This tool is part of Digium's most recent project - AsteriskNow.
1. Requirements
In order to install "Asterisk GUI" you'll need:
2. Preparation
Go to your installation directory (for example '/usr/src') and download the latest version of asterisk-gui. To do this just execute the command:
3. Compiling and installing
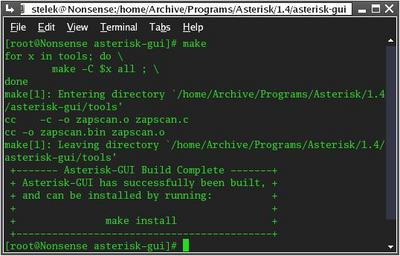
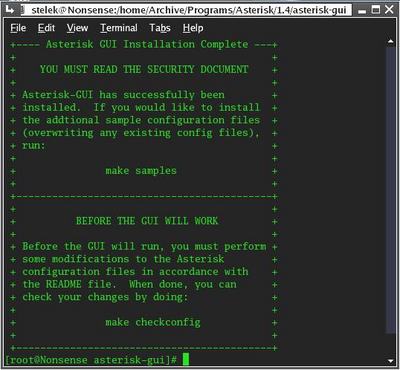
Enter this directory and compile the sources by executing the command `make`Then distribute the compiled code by executing the command `make install`. With this step you will finish the installation of the asterisk-gui (see our sample output log make_install.log).
4. Configuration
It is recommended to back up your configuration files before you continue. To achieve this just copy /etc/asterisk under different name:
There are two files which you should modify:
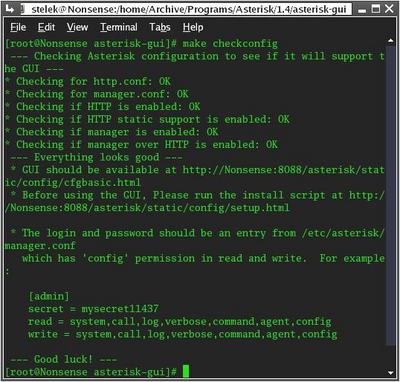
After that run `make checkconfig` in your asterisk-gui directory. This script will check if your GUI is correctly configured.
5. Running asterisk-gui
In order to load the asterisk-gui, asterisk must restart/reload. You can reload your Asterisk server from your CLI console by executing the command `reload`. You can use asterisk-gui from these addresses (10.100.100.75 is our Asterisk server IP address):
6. Configuration files
You can download and use our configuration files:
This tutorial is meant to guide you during the installation of "Asterisk GUI".The Digium's Asterisk GUI is available only for version 1.4 of Asterisk. This tool is part of Digium's most recent project - AsteriskNow.
1. Requirements
In order to install "Asterisk GUI" you'll need:
Concurrent Versions System (CVS)
asterisk 1.4 - and all modules needed to compile and install asterisk 1.4
asterisk 1.4 - and all modules needed to compile and install asterisk 1.4
2. Preparation
Go to your installation directory (for example '/usr/src') and download the latest version of asterisk-gui. To do this just execute the command:
svn checkout http://svn.digium.com/svn/asterisk-gui/trunk asterisk-gui
By executing this command the sources of Asterisk GUI will be downloaded (see our sample output log svn.log) into ./asterisk-gui/ directory.3. Compiling and installing
Enter this directory and compile the sources by executing the command `make`Then distribute the compiled code by executing the command `make install`. With this step you will finish the installation of the asterisk-gui (see our sample output log make_install.log).
4. Configuration
It is recommended to back up your configuration files before you continue. To achieve this just copy /etc/asterisk under different name:
cp -r /etc/asterisk /etc/asterisk.backup
It is recommended to `install samples`. This command will modify some of your Asterisk configuration files. After that you'll have finish the configuration modification manually.There are two files which you should modify:
`manager.conf`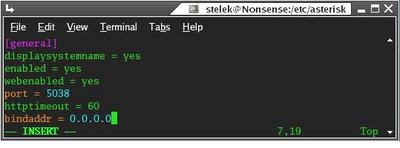
We will have to add a new user to `manager.conf`: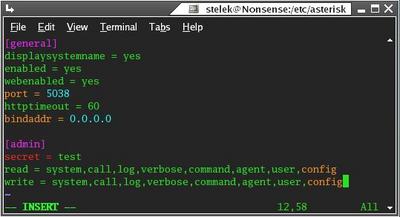
`http.conf`
enabled = yes
webenabled = yes
webenabled = yes

We will have to add a new user to `manager.conf`:
[administrator]
secret = wrxiur
read = system,call,log,verbose,command,agent,user,config
write = system,call,log,verbose,command,agent,user,config
secret = wrxiur
read = system,call,log,verbose,command,agent,user,config
write = system,call,log,verbose,command,agent,user,config

`http.conf`
enabled=yes
enablestatic=yes
bindaddr=0.0.0.0
enablestatic=yes
bindaddr=0.0.0.0

After that run `make checkconfig` in your asterisk-gui directory. This script will check if your GUI is correctly configured.
5. Running asterisk-gui
In order to load the asterisk-gui, asterisk must restart/reload. You can reload your Asterisk server from your CLI console by executing the command `reload`. You can use asterisk-gui from these addresses (10.100.100.75 is our Asterisk server IP address):
http://10.100.100.75:8088/asterisk/static/config/cfgbasic.html
http://10.100.100.75:8088/asterisk/static/config/cfgadvanced.html
http://10.100.100.75:8088/asterisk/static/config/cfgadvanced.html

6. Configuration files
You can download and use our configuration files:
| Add Comment |
Latest Headlines:
-
T.38 faxing with Zoiper 2.15 is now easier than ever
section: voip software
-
Asterisk 1.4.21 Released
section: Asterisk
-
Asterisk 1.4.20 Released
section: Asterisk
-
Asterisk 1.4.20-rc2 Released
section: Asterisk
-
Asterisk 1.4.20-rc1 Now Available
section: Asterisk
- News Archives (older news)
Latest Tutorials:
-
Sending Fax from Zoiper to Zoiper using T.38
added 08/Dec/2008 18:16
-
VMAuthenticate (dialplan application)
added 01/Mar/2008 15:57
-
Siptronic ST-530
added 06/Nov/2007 17:57
-
Siemens C455 IP hardphone
added 05/Nov/2007 10:24
-
Zoiper
added 22/Oct/2007 17:53
Latest Comments:
-
. : , , . ...
tutorial: manager.conf
-
https://nnparksandrec.org/wp-content/upl...
tutorial: SIP with NAT or Firewalls
-
СпаÑибо за обÑÑÑнение...
tutorial: DrayTek Vigor 2900V - broadband security voip router
-
https://the-strangers-chapter-3-korea.re...
tutorial: Read (dialplan application)
-
https://the-undertaker-2-thai-movie.read...
tutorial: Read (dialplan application)


