

3.2.14. ST - 302 IP Phone (YWH500) - IAX2 hardphone
1. Introduction

2. Prerequisites
3. Asterisk PBX configuration
4. Configurations on the ST-302 IP PHONE
5. Additional information
6. Uploaded Files
7. Reference
ST-302 IAX2 IP PHONE is a hardphone, which uses the Inter-Asterisk eXchange(IAX2) protocol. It has two RJ45 ports. One for connection with a PC, and another one for connection with the network.
This phone supports lots of protocols including H.323, MGCP, SIP, IAX2, Net2phone (private protocol), HTTP, DNS, DHCP, PPPoE and TFTP. It also supports different vocodecs like G.711 A-/U-law, G.723.1, G.729, iLBC and gsm.
This phone supports lots of protocols including H.323, MGCP, SIP, IAX2, Net2phone (private protocol), HTTP, DNS, DHCP, PPPoE and TFTP. It also supports different vocodecs like G.711 A-/U-law, G.723.1, G.729, iLBC and gsm.

Features
- Support H.323 v4, compatible with most H.323 v1-v4 system and devices;
- Built in H.323 proxy support to pass NAT;
- Support MGCP RFC2705;
- Support SIP RFC3261;
- Support IAX (in the next firmware versions);
- Support Net2phone private protocol;
- Fast start and H.245 tunneling;
- Outband DTMF transmit by H.245 user input or Q.931 keypad;
- IEEE 802.3 /802.3 u 10 Base T / 100Base TX;
- Major G.7XX and gsm610 audio codec;
- Caller ID send and receive by Q.931;
- Provide direct IP address to IP address call mode, direct PSTN call by a voice gateway ,E.164 phone number call under the mode of GK;
- Automatically gatekeeper discovery in LAN;
- Call PSTN by ITSPs prepaid card (eTalk,italk,ringtec etc);
- DHCP support for automatically assign IP address and others relevant parameters;
- PPPoE support for ADSL or Cable modem;
- Setting IP Net Phone parameters by standard web browser (such as IE6.0), phone keypad or standard telnet;
- Upgrade program by FTP mode;
- Support G.723.1 5.3k/6.3k,nG.729,nG.711 A-Law/u-Law audio codec algorithm;
- Dynamic voice detection; Echo cancellation; Comfort noise generation;
- Dynamic voice jitter buffer which minimize effect to the voice caused by the audio delay and jitter and as a result the quality of voice is high;
- Tone generation and Local DTMF generation and detection according with ITU-T;
- E.164 dial plan and customized dial rules;
- Echo cancellation: G165 16ms;
- Store quick dial number: 100;
- Record phone number of missed call:80;
- 40 entries each for missed call, answered call and dialed call;
- 100 entries for quick dial;
- 16 entries for voice message;
- LCD display dial datacaller name caller number and so on;
- Working status indicating Lamps (red yellow and green) and keypad jacklight;
- Independently adjustment the volume of handset and hand free;
- 14 function keys for operating and setting phone besides standard keys 0-9,#;
- Speed dialing;
- Adjustable volume for both handset and speaker;
- 16 function keys, background LED and states indicating lights;
- Settings by HTTP web browser (IE6.0);
- Advanced settings by Telnet;
- Voice prompt;
- Upgrade by TFTP;
Technical parameters
- Main chip: 50Mhz;
- Data storage:2MB SDRAM;
- Program memory: 1MB Flash memory;
- Application Network environment: 10Base-T/100Base-T;
- Power loss:2.7W(max);
- Power adapter: input AC 220V, output DC 9V 500mA;
- Data storage:2MB SDRAM;
- Program memory: 1MB Flash memory;
- Application Network environment: 10Base-T/100Base-T;
- Power loss:2.7W(max);
- Power adapter: input AC 220V, output DC 9V 500mA;
Standards and Protocols
- H.323 V4 calling signal protocol;
- MGCP RFC2705;
- SIP RFC3261 and IAX;
- Net2phone private protocol;
- IEEE 802.3 10Base-T/100Base-TX RJ-45 port;
- Major G.7XX and gsm610 audio codec;
- Audio codec algorithm include G.711A,G.711u,G.723.1(5.3k/6.3k) and G.729;
- Quick dial setting and user-defined dial plan setting;
- TCP/IP: Internet Transport and Control Protocol;
- RTP: Real-time transport Protocol;
- RTCP: Real-time Transport Control Protocol;
- G.723.1G729 VAD/CNG economical bandwidth;
- G165 16ms Echo cancellation;
- DTMF: Tone Detection and Generation;
- DHCP: Dynamic Host Configuration Protocol;
- PPPoE: Point to Point Protocol over Ethernet;
- DNS: Domain Name Service;
- NTS: Network Time service;
- Telnet: Remote Host log on Protocol;
- FTP: File Transfer Protocol;
- HTTP: Hyper Text transfer Protocol;
- Build in H.323 proxy support;
- Auto search proxy;
Operating requirements
- Operation temperature: 0 to 50° C (32° to 122° F);
- Storage temperature: -30° to 65° C (-22° to 149° F)
- Humidity: 10 to 90% no dew;
- Storage temperature: -30° to 65° C (-22° to 149° F)
- Humidity: 10 to 90% no dew;
Electric requirements
- Voltage: 9V DC;
- Power: 0.5W(max.);
- Power adapter: AD/DC input 110-240V, 1A400Ma;
- Power: 0.5W(max.);
- Power adapter: AD/DC input 110-240V, 1A400Ma;
In this tutorial we will show you how to make the configuration of your phone, in order to work with Asterisk PBX.
2. Prerequisites
1) You need a working Asterisk PBX with registered users and made extensions.
2) On the back of the phone there are two RJ-45 ports. One of them is labeled PC and the other one - RJ-45.
Put the Ethernet cable from your network in the port labeled RJ-45.
Use another Ethernet cable to connect your computer with the phone. Put this cable in the RJ-45 jack labeled PC.
3) Plug the power cord in the phone. You will see that on the back of the phone, there is a switch button. Use it to switch on or switch off the phone.
3. Asterisk PBX configuration
1) iax.conf
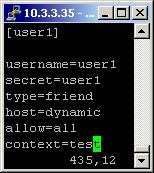
We need to create one user in the iax.conf file. This is because the phone is using the IAX2 protocol, for a connection with the Asterisk PBX.
So, we have created the user user1. This one will be used with the ST-302 IP PHONE.
Type=friend means that the user could make and receive calls. Host=dynamic means that the IP is not static but dynamic through a DHCP server. Allow=all means that the line which this user will be using, could support all the audio codecs. Context=test - this shows that the user is working with the extensions in this context of the configuration file extensions.conf.
Type=friend means that the user could make and receive calls. Host=dynamic means that the IP is not static but dynamic through a DHCP server. Allow=all means that the line which this user will be using, could support all the audio codecs. Context=test - this shows that the user is working with the extensions in this context of the configuration file extensions.conf.
2) extensions.conf

Now, lets take a look at the extensions.conf file.
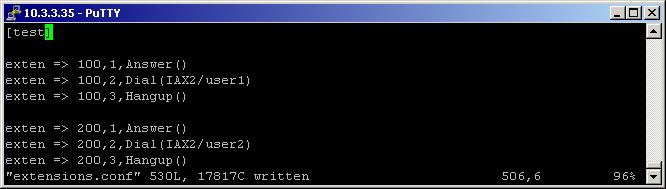
On the picture above you can see our extensions.conf file.
We will create our extensions in the [test] context of the extensions.conf file.
We have two phone numbers - 100 and 200. For each of them we have by three extensions. We are working in the [test] context.
When somebody dials number 100, the call will be answered by the Answer application. The next application which will be executed is the Dial one. Thanks to it, the call will be connected with the user user1 through the IAX2 channel. User1 is actually the user which we are going to use for the ST-302 IP PHONE. The last extension is using the Hangup application. Its purpose is to hang up the line after the conversation is over. It is a good idea to use always this application in your dialplans. So when somebody dials the number 100 number, the ST-302 IP PHONE will start ringing - the call will be connected to this phone.
We have absolutely the same extensions for number 200 but they are valid for the user user2. We are going to use this user with our softphone Idefisk. So when somebody dials the number 200 from the ST-302 IP PHONE, the call will be connected with our softphone.
For more information about how to make the configurations in the Asterisk's configuration files please read our tutorial about the Configuring IP Phones for use with Asterisk
4. Configurations on the ST-302 IP PHONE
The configuration of the phone could be done in two ways. The first one is through the Web Interface and the second one is through Telnet. The first one is the more commonly used one, while the second one is for more advanced users.
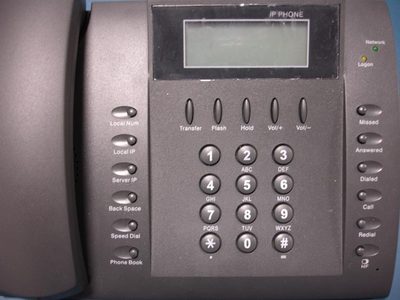
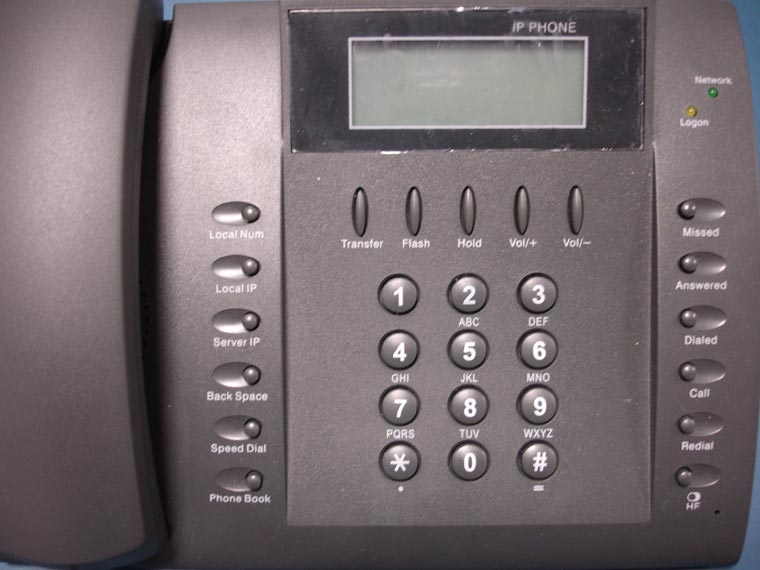
For both of the ways, first you need to find out the IP address of the phone. For the purpose, look at the front panel of the phone. On the left side there are six buttons. One of them, the third one is labeled as Local IP. Press this button and the IP address of the phone, will be displayed on its screen. Also, you will hear a voice, which will dictate this IP address. In our case the IP address was 10.0.1.144. This is because we are using DHCP. If you do not use DHCP then the default IP address of the phone has to be 198.162.1.100
Making configuration through the Web interface


The Address book


The Upgrade firmware button

Making configuration through Telnet

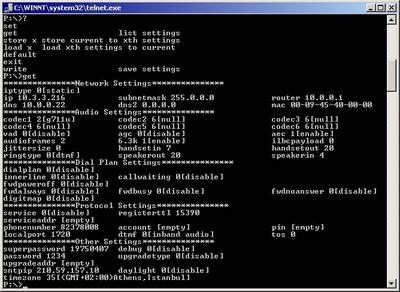
For both of the ways, first you need to find out the IP address of the phone. For the purpose, look at the front panel of the phone. On the left side there are six buttons. One of them, the third one is labeled as Local IP. Press this button and the IP address of the phone, will be displayed on its screen. Also, you will hear a voice, which will dictate this IP address. In our case the IP address was 10.0.1.144. This is because we are using DHCP. If you do not use DHCP then the default IP address of the phone has to be 198.162.1.100
Making configuration through the Web interface
The Web interface has two access modes - ordinary and super. The first one does not give you access to the Settings considering the IAX2 protocol. However the super mode gives you access to all the Settings, including the ones for the IAX2 protocol.
First, lets take a look at the ordinary access mode.
Open your Web Browser and type the IP address you have obtained by pressing the Local IP button on the front side of the phone. A new page will be opened and you will see a prompt to enter the password.
First, lets take a look at the ordinary access mode.
Open your Web Browser and type the IP address you have obtained by pressing the Local IP button on the front side of the phone. A new page will be opened and you will see a prompt to enter the password.

The default password for the ordinary mode is 1234. Once you are logged in you can change it to whatever you want. Note that you cannot change the password for the super mode.
When you enter the correct password a new page will be opened.
When you enter the correct password a new page will be opened.
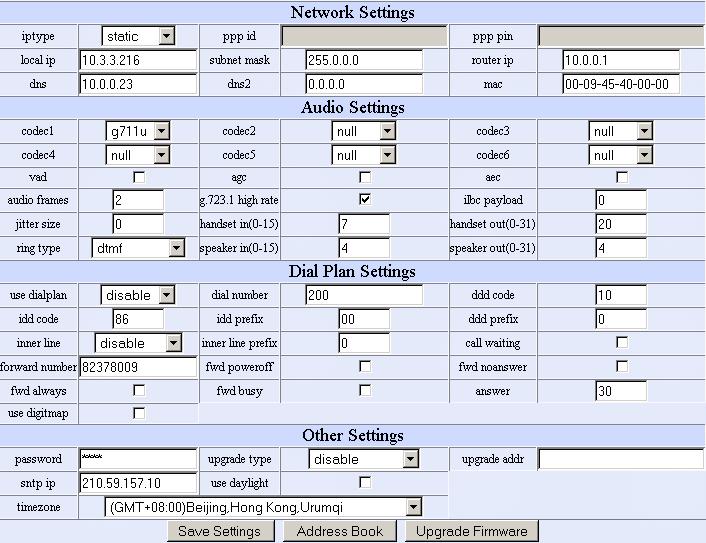
Here you could perform the following operations:
Once you are ready with all the settings press the Save button. The phone will reboot immediately.
Now let's take a look at the super access mode
Open your Web Browser and type the IP address you have obtained by pressing the Local IP button on the front side of the phone. A new page will be opened and you will see a prompt to enter the password.
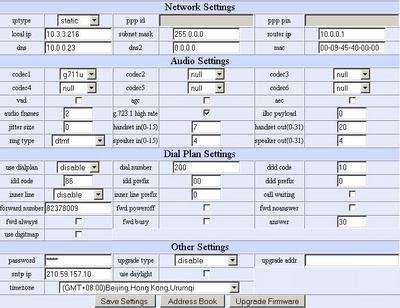
1) Network Settings
- iptype - it could be static, dhcp, pppoe or modem;
- ppp id and ppp pin - if the iptype is selected to pppoe or modem. In these two fields you have to write username and password. The ppp id is for the username and ppp pin is for the password. In our case we have set this option to static
- local ip - if the iptype is selected to static. Write the IP address of the phone. In our case it is 10.3.3.216. In your case could be different;
- subnet - if the iptype is selected to static. Write the subnet mask. In our case it is 255.0.0.0. In your case could be different;
- router ip - if the iptype is selected to static. This is for the IP address of your gateway. In our case it is 10.3.3.213. In your case could be different;
- dns - if the iptype is selected to static. This is the IP address of your DNS. In our case it is 10.0.0.23. In your case could be different;
- dns2 - if the iptype is selected to static. The IP address of your alternative DNS;
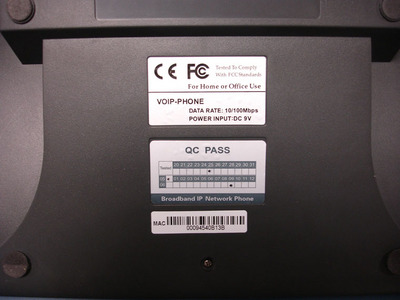
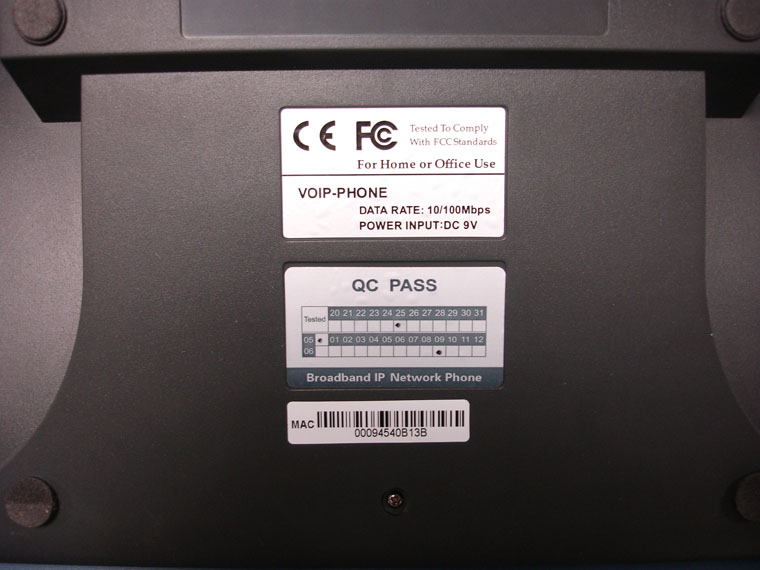
- mac - the MAC address. It is printed at the back of the device;
- ppp id and ppp pin - if the iptype is selected to pppoe or modem. In these two fields you have to write username and password. The ppp id is for the username and ppp pin is for the password. In our case we have set this option to static
- local ip - if the iptype is selected to static. Write the IP address of the phone. In our case it is 10.3.3.216. In your case could be different;
- subnet - if the iptype is selected to static. Write the subnet mask. In our case it is 255.0.0.0. In your case could be different;
- router ip - if the iptype is selected to static. This is for the IP address of your gateway. In our case it is 10.3.3.213. In your case could be different;
- dns - if the iptype is selected to static. This is the IP address of your DNS. In our case it is 10.0.0.23. In your case could be different;
- dns2 - if the iptype is selected to static. The IP address of your alternative DNS;
- mac - the MAC address. It is printed at the back of the device;
2) Audio Settings
- codec1 - codec6 - you could choose which codec to be used by your hardphone. The phone will try to use the one, which you set as codec1. If it is not allowed on your Asterisk PBX then the phone will try with codec2 and etc. In our case we have set this to uG711u. In your case you could use a different one;
- vad - this is Voice Activity Detection. This is a technology that recognizes when a person is speaking and when a person is silent to suppress sending unnecessary noise across a telecommunications line;
- agc - Automatic Gain Control. Algorithm to normalize the volume regardless of the speaker's position relative to the microphone;
- aec - Acoustic Echo Cancellation. A method for removing the acoustic echoes returned from a room that would otherwise cause closed-loop feedback in a full-duplex conferencing system;
- audio frames -the number of frames into RTP package. It could be between 1 and 8;
- g.723.1 high rate - enable, disable;
- ilbc payload - it could be between 96-255;
- jitter size - the size of the jitter buffer. It could be between 0 and 32;
- handset in(0-15) - the volume of the handset input audio;
- handset out(0-31) - the volume of the handset output audio;
- ring type - could be: dtmf, not disturb, user define or advanced;
- speaker in(0-15) - the volume of the handfree input audio;
- speaker out(0-31) - the volume of the handfree output; audio;
3) Dial Plan Settings
- use dialplan - it could be enable, disable, dialnum, prefix or hotline;
- dial number - this is the field is used with the prefix, hotline and dialnum options;
- ddd code - Direct distance dialing code. DDD is a telephone system which enables users to directly dial telephone numbers outside the user's local exchange area without the aid of an operator. In other words this is the Area Code;
- idd code - International Direct Dialing code. In other words this is the Country code;
- idd prefix - here you set a digit/digits. If the number starts with them, they will be removed and just the rest of the number will be dial actually. For example if the number you dial starts with 00, then this digits (00) will be removed adn just the rest of the number will be dialed actually;
- ddd prefix - here you set a digit/digits. If the number starts with them, they will be replaced with the digit/digits you have been set as ddd code. For example if the number you dial starts with 0, then this digit (0) will be replaced by the digits you have been set as ddd code;
- inner line - it could be enable, disable or omit prefix;
- inner line prefix - it is a digit/digits. If the number starts with them, then the actually dialed number will be assumed as inner line number;
- call waiting - this is the feature that allows you to be notified of another incoming call, while you still have a call in progress;
- forward number - set a number to which your calls to be redirected in case of certain conditions;
- fwd poweroff - the incoming calls will be redirected to the forward number, if your phone is switched off;
- fwd noanswer - the incoming calls will be redirected to the forward number, if you do not answer in the time set by the answer option;
- answer - Time in seconds (we did not manage to get the forwarding work. So, please if somebody manage to achieve this give us a post as a comment at the end of the page);
- fwd busy - the incoming calls will be redirected to the forward number, if the phone is busy;
- fwd always - the incoming calls will be redirected always to the forward number;
- use digitmap - Digit map is a set of rules which has for purpose to determine when the user has finished dialing. So if this option is checked then you do not have to press the Call button in order to dial the desired number. It will be done automatically. With the MGCP protocol this option has to be used always;
For more information about all the dial plan settings you could visit the web site placed in our reference section at the end of the tutorial.
- if it is dialnum - the digit/digits set in the dial number option will be added before any other prefixes to the number and the new number will be the actually dialed one. It will be like this one: dial number + idd code + ddd code + number;
- if it is prefix - the dialed number will be replaced with the number set in the dial number field;
- if it is hotline - if this option is used, when you pick up the handset, the number set in the dial number field will be immediately dialed. For example if you set there 100 this number will be dialed, as soon as you pick up the handset;
- if it is enable - you could set prefixes, which to be added to, to be replaced with or removed from your dialed numbers. This prefixes could be defined in the ddd code, idd code, idd prefix and ddd prefix options;
- dial number - this is the field is used with the prefix, hotline and dialnum options;
- ddd code - Direct distance dialing code. DDD is a telephone system which enables users to directly dial telephone numbers outside the user's local exchange area without the aid of an operator. In other words this is the Area Code;
- idd code - International Direct Dialing code. In other words this is the Country code;
- idd prefix - here you set a digit/digits. If the number starts with them, they will be removed and just the rest of the number will be dial actually. For example if the number you dial starts with 00, then this digits (00) will be removed adn just the rest of the number will be dialed actually;
- ddd prefix - here you set a digit/digits. If the number starts with them, they will be replaced with the digit/digits you have been set as ddd code. For example if the number you dial starts with 0, then this digit (0) will be replaced by the digits you have been set as ddd code;
- inner line - it could be enable, disable or omit prefix;
- In enable mode - if the dialed number starts with the digit/digits set in the inner line prefix option, then the number sent is just the number dialed because this number is assumed as a inner line number. Otherwise, the number sent will be the one converted according to the parameters in the use dial plan options;
- In omit prefix mode - if the number dialed is prefixed by inner line prefix, then the number sent will be the number dialed without this prefix;
- In omit prefix mode - if the number dialed is prefixed by inner line prefix, then the number sent will be the number dialed without this prefix;
- inner line prefix - it is a digit/digits. If the number starts with them, then the actually dialed number will be assumed as inner line number;
- call waiting - this is the feature that allows you to be notified of another incoming call, while you still have a call in progress;
- forward number - set a number to which your calls to be redirected in case of certain conditions;
- fwd poweroff - the incoming calls will be redirected to the forward number, if your phone is switched off;
- fwd noanswer - the incoming calls will be redirected to the forward number, if you do not answer in the time set by the answer option;
- answer - Time in seconds (we did not manage to get the forwarding work. So, please if somebody manage to achieve this give us a post as a comment at the end of the page);
- fwd busy - the incoming calls will be redirected to the forward number, if the phone is busy;
- fwd always - the incoming calls will be redirected always to the forward number;
- use digitmap - Digit map is a set of rules which has for purpose to determine when the user has finished dialing. So if this option is checked then you do not have to press the Call button in order to dial the desired number. It will be done automatically. With the MGCP protocol this option has to be used always;
For more information about all the dial plan settings you could visit the web site placed in our reference section at the end of the tutorial.
4) Other Settings
- password - this is where you could change the password for the ordinary access mode;
- upgrade type - it could be disable, all, mac, ppp id, account, phonenumber;
- upgrade addr - here you could write the IP address or the domain name of the FTP server;
- sntp ip - IP address of you local time server. If you set it to 255.255.255.255 - the phone will not visit time server to get the time and date;
- use daylight - enable, disable;
- timezone - select the correct timezone;
- upgrade type - it could be disable, all, mac, ppp id, account, phonenumber;
- all - the phone will find the binary firmware file and configuration file, which match the hardware model from the FTP server specified by the upgrade addr option;
- mac - the phone will find the matching binary firmware file and configuration file, which match the MAC address from the FTP server specified by the upgrade addr option;
- ppp id - the phone will find the matching binary firmware file and configuration file, which match the ppp id from the FTP server specified by the upgrade addr option;
- account - the phone will find the matching binary firmware file and configuration file, which match the account from the FTP server specified by the upgrade addr option;
- phonenumber - the phone will find the matching binary firmware file and configuration file, which match the phone from the FTP server specified by the upgrade addr option;
- upgrade addr - here you could write the IP address or the domain name of the FTP server;
- sntp ip - IP address of you local time server. If you set it to 255.255.255.255 - the phone will not visit time server to get the time and date;
- use daylight - enable, disable;
- timezone - select the correct timezone;
Once you are ready with all the settings press the Save button. The phone will reboot immediately.
Now let's take a look at the super access mode
Open your Web Browser and type the IP address you have obtained by pressing the Local IP button on the front side of the phone. A new page will be opened and you will see a prompt to enter the password.
The default password for the super access mode is 19750407. Once you are logged in you could change it to whatever you want.
When you enter the correct password a new page will be opened.
When you enter the correct password a new page will be opened.
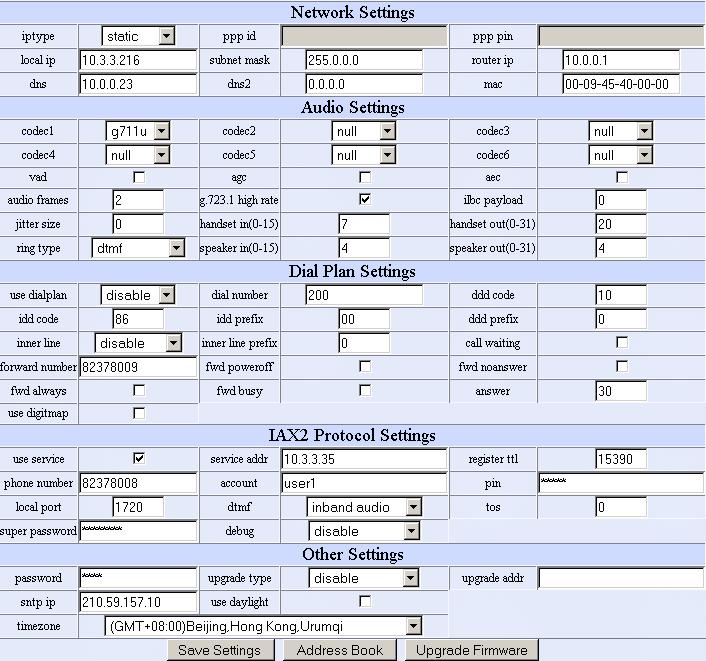
As you could see, in this mode, you could make all the things, which you could do in the ordinary mode, but there is one more section - IAX2 Settings.
So for information about the Network, Audio, Dial Plan and Other Settings, please read the section considering the ordinary mode. Here we will explain you the IAX2 Settings.
Once you are ready with all the settings press the Save button. The phone will reboot immediately.
So for information about the Network, Audio, Dial Plan and Other Settings, please read the section considering the ordinary mode. Here we will explain you the IAX2 Settings.
- use service - enable, disable. Use this setting, when you would like to make calls through gatekeeper. Otherwise you will be able to make calls only through gateway or IP to IP calls;
- service addr - type the IP address of your Asterisk PBX. In our case this is 10.3.3.35. In your case could be different. If you do not use the default port, which is 4569, then type the IP address of the server followed by : and then the port your are using;
- registerttl - set time in seconds. This option will cause the phone to send keep-alive registration message to the Asterisk, every registerttl seconds. In our case we have set this to 15360. In your case you could use a different period of time;
- phone number - you could type here the phone number at which you are reachable on the ST-302 IP Phone. This phone number will be displayed on the screen of the phone;
- account - this is the username which the phone will use to register to the Asterisk server. Actually this is the name which we have set in the iax.conf file, as a username. In our case this is user1. In your case could be different;
- pin - this is the password which the phone will use to register to the Asterisk server. Actually this is the password which we have set in the iax.conf file, as a secret. In our case this is user1. In your case could be different;
- local port - this is the port on which the phone will negotiate registration information with the server. By default it is 4569;
- dtmf - could be inband or outband;
- tos - this is the for the tos field of the IP header of the RTP packets. It could be between 0 and 224;
- super password - this is where you could change the password for the super access mode;
- debug - it could be disable, output, output all, remote debug or no check;
- disable - disable the outputting of the debug information;
- output - output the operation information;
- output all - output all debug information and data;
- remote debug - save the debug information in the SDRAM of the phone;
- no check - Disable the checking of the firmware tags, when upgrading. However be careful because this will increase the risk of upgrading the wrong firmware;
Once you are ready with all the settings press the Save button. The phone will reboot immediately.
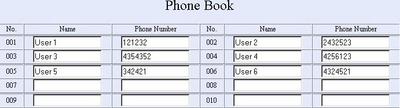
The Address book
If you what to add an entry in the phone book you have to do this through the Web Interface. Log in as ordinary or super user. At the bottom of the page you will see the Phone Book button.

You have place for 100 entries. You could write name and phone number for each entry.


When you want to dial a phone from the Phone book, first you have to type the number of the entry through the keypad and then to press the Phone Book button placed on the front panel of the IP Phone. For example if you want to dial the number at entry 98 in the Phone Book - type 98 with the keypad and then press the Phone Book button placed on the front panel of the phone.
The Upgrade firmware button
When you press the Upgrade firmware button, you will see the following window:

It will allow you to perform the following operations:
- Update the Firmware - You will have to download the firmware files. You could do this from this web site. The number of the phone is YWH500. So far the latest available release is 1.46. It supports the following languages: English, Chinese, French and German. For each language there are five files. They are for the different protocols which the phone could support. The supported protocols are: IAX2, H323, SIP, MGCP and N2P (NET2 Phone). Use the firmware file for the protocol you would like.
So press the Browse button against the Upgrade Firmware file Name field. Then press the Upgrade Firmware button. Please pay attention that after the upgrading is done, the phone's settings will be return to the factory's ones.
The upgrade of the firmware could be done by both of the modes - ordinary and super
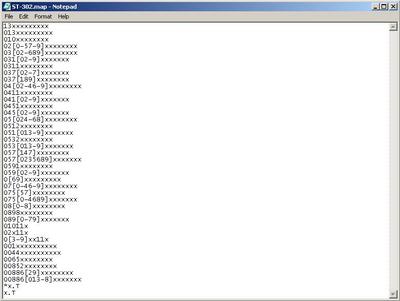
- Update the Digitmap - You could make your own set of rules and upload them in the phone. The rules has to be written in a simple text file like the following:
So press the Browse button against the Upgrade Firmware file Name field. Then press the Upgrade Firmware button. Please pay attention that after the upgrading is done, the phone's settings will be return to the factory's ones.
The upgrade of the firmware could be done by both of the modes - ordinary and super
- Update the Digitmap - You could make your own set of rules and upload them in the phone. The rules has to be written in a simple text file like the following:
Each line starts with digits and then is followed by X characters. The digits represents prefixes. Only phone the numbers starting with this digits will be actually dialed. So for example: 13XXXXXXXX will allow the dialing of numbers which start with 13 and which are 10 digits long. If your number starts with 14 it won't be dialed.
- Update the Ring list - You could create your own ring list files, which you could use as a ring tones for you IP Phone. The ring tones has to be with Sample rate: 8000, 16-bit and MONO. They have to be compressed with G 723.1 or G 729.1 codec. The extension of the file has to be .dat. You could create such a file by using the Cool Edit program to record the file and PalmTool program for compressing and converting the audio file.
When you are ready with the file upload it.
There is one more step - from the main menu, go to the Audio Settings option and choose the ring type to be user define.
Making configuration through Telnet
So in order to make a telnet configuration type: telnet 10.3.3.216. We wrote 10.3.3.216 because this is the IP address of our phone. In your case it could be different.
You will be asked for a password. As in the Web Interface configuration, you could type two passwords. The ordinary access mode password - 1234 and the super access mode password - 19750407. They will allow you to make the same configurations as in the Web Interface. In the Super mode you could change everything and in the ordinary mode you could change everything except the settings for the IAX2 protocol.
You will be asked for a password. As in the Web Interface configuration, you could type two passwords. The ordinary access mode password - 1234 and the super access mode password - 19750407. They will allow you to make the same configurations as in the Web Interface. In the Super mode you could change everything and in the ordinary mode you could change everything except the settings for the IAX2 protocol.
Use the question mark character (?), to see a list with the available commands. They are: set, get, store, load, default, exit and write. Against each command you could see a short description.
- The write command will allow you to save all the changes you made.
- The purpose of the exit command is clear.
- The default command will reset the phone to its factory settings.
- The store x command will store the current configuration in the flash memory of the phone. X plays the role of a name. So, if you want to save the current configuration in a fil e named backup, type the following: store backup.
- The load x command will load a previously stored configuration from the flash memory of the phone. X plays the role of a name. So, if you want to load the configuration named backup, type the following: load backup.
- The get command will show you a list will all the options and their current values
- Through the set command you could change every option listed with the get command. For example to change the password for the ordinary mode type the following: set password <new password>. NOTE that there are some option like the timezone which has to be set through numbers. For example, if you want to set the time zone to (GMT +02:00) Athens, Istanbul you have to type the following; set timezone 35. Unfortunately there is no list with the values so you have to learn them by trying different numbers.
5. Additional information
In order to restore the factory settings of the phone, please do the following:
All of the phone system settings will be restored
- Unplug the power cord;
- Plug the power back in. You have to keep the asterisk key (*) on the phone, while your are plugging in the power cord;
- Wait until you see the asterisk (*) character and two bars, displayed on the screen of the phone;
- Type #5*5
- Plug the power back in. You have to keep the asterisk key (*) on the phone, while your are plugging in the power cord;
- Wait until you see the asterisk (*) character and two bars, displayed on the screen of the phone;
- Type #5*5
All of the phone system settings will be restored
6. Uploaded Files
7. Reference
| Add Comment |
Latest Headlines:
-
T.38 faxing with Zoiper 2.15 is now easier than ever
section: voip software
-
Asterisk 1.4.21 Released
section: Asterisk
-
Asterisk 1.4.20 Released
section: Asterisk
-
Asterisk 1.4.20-rc2 Released
section: Asterisk
-
Asterisk 1.4.20-rc1 Now Available
section: Asterisk
- News Archives (older news)
Latest Tutorials:
-
Sending Fax from Zoiper to Zoiper using T.38
added 08/Dec/2008 18:16
-
VMAuthenticate (dialplan application)
added 01/Mar/2008 15:57
-
Siptronic ST-530
added 06/Nov/2007 17:57
-
Siemens C455 IP hardphone
added 05/Nov/2007 10:24
-
Zoiper
added 22/Oct/2007 17:53
Latest Comments:
-
https://bento.me/films-voir-le-royaume-d...
tutorial: Request to schedule in the past?!?!
-
https://bento.me/films-voir-civil-war-20...
tutorial: Request to schedule in the past?!?!
-
https://bento.me/voir-navoue-jamais-2024...
tutorial: Request to schedule in the past?!?!
-
https://skfb.ly/oTOvD
https://skfb.ly/o...
tutorial: General Installation
-
ceritinib will increase the level or eff...
tutorial: ast_rtp_read: Unknown RTP codec X received